


I've tried to cover most of the key concepts/ technologies utilised in VPCs in this post, but I will discuss some capabilities in subsequent posts in this series.
We go deep into what a VPC is, where it stands in the world of cloud networking and best practices..
Introduction to VPCs
What is a VPC?
A VPC (Virtual Private Cloud) is where you can launch AWS resources (such as EC2 instances, databases and storage) in your own logically isolated virtual network, unlike your traditional data centre. Instead of racking and configuring equipment in a DC, you launch resources into your VPC.
As a network engineer working in the cloud, it's important to get a grasp on VPCs, as this is where you will define your;
- Security - NACLs, Security Groups, other AWS Services like AWS Network Firewall endpoints, and more.
- IP Address Schema - You'll define subnets and IP schemas for each VPC where required.
- Routing Control - Even though you're in the cloud, routing is still a thing. In a VPC, you can dictate how and where traffic enters and exits, along with internet access for your VPC with an Internet Gateway.
- Load Balancers - Utilising AWS' Elastic Loadbalaners, you specify how traffic is sent to resources, whether TLS offload is something to consider, and leveraging auto-scaling groups. Again, considerations for your IP schema.
- Hybrid Connectivity - VPCs enable hybrid connectivity, allowing you to connect your on-premises data centre to your AWS VPC environment using technologies such as VPNs or AWS Direct Connect.
- Workloads - Compute, such as EC2 and Database instances, are placed into your VPCs.
- Cost Efficiency - Although not considered a Network Engineer's priority, you can minimise your data transfer fees and resource utilisation by ensuring a properly configured VPC and technologies are implemented.
Considerations When Working With VPCs
Now that we've briefly covered the AWS VPC let's consider some things when working with your VPCs. A VPC in itself is an isolated environment, but you can allocate many VPCs to your AWS account, logically separating/ dividing your workloads depending on requirements. This would be an architectural or design decision, but you could utilise separate VPCs for;
- Different applications or services are being hosted.
- Security - Having a separate VPC for your security infrastructure, pointing all your inbound and outbound traffic to that VPC for scanning and blocking/ allowing traffic.
- Central Egress - We'll get more into NAT Gateway/ Internet Gateways below, but we could create a VPC purely for egress traffic from your instances/ compute in other VPCs.
- Central Ingress - You may choose to have a central ingress point for all traffic to reach your services located in other VPCs, making use of Transit Gateway, AWS Network Firewall (we'll cover these later) or Vendor-specific software appliances (such as Cisco, Juniper etc.).
Although we've briefly covered some design-based considerations around VPCs, there are underlying technology items we need to examine.
VPC Level Technologies
NACLs (Network Access Control Lists)
When you create a VPC, a default NACL is created alongside it. This default NACL is open, and any subnets created will be associated with this list, allowing all traffic in and out. NACLs themselves are stateless, meaning you must ensure you stipulate what traffic you want entering and exiting, considering return traffic. Newly created Network ACLs are default deny-all.
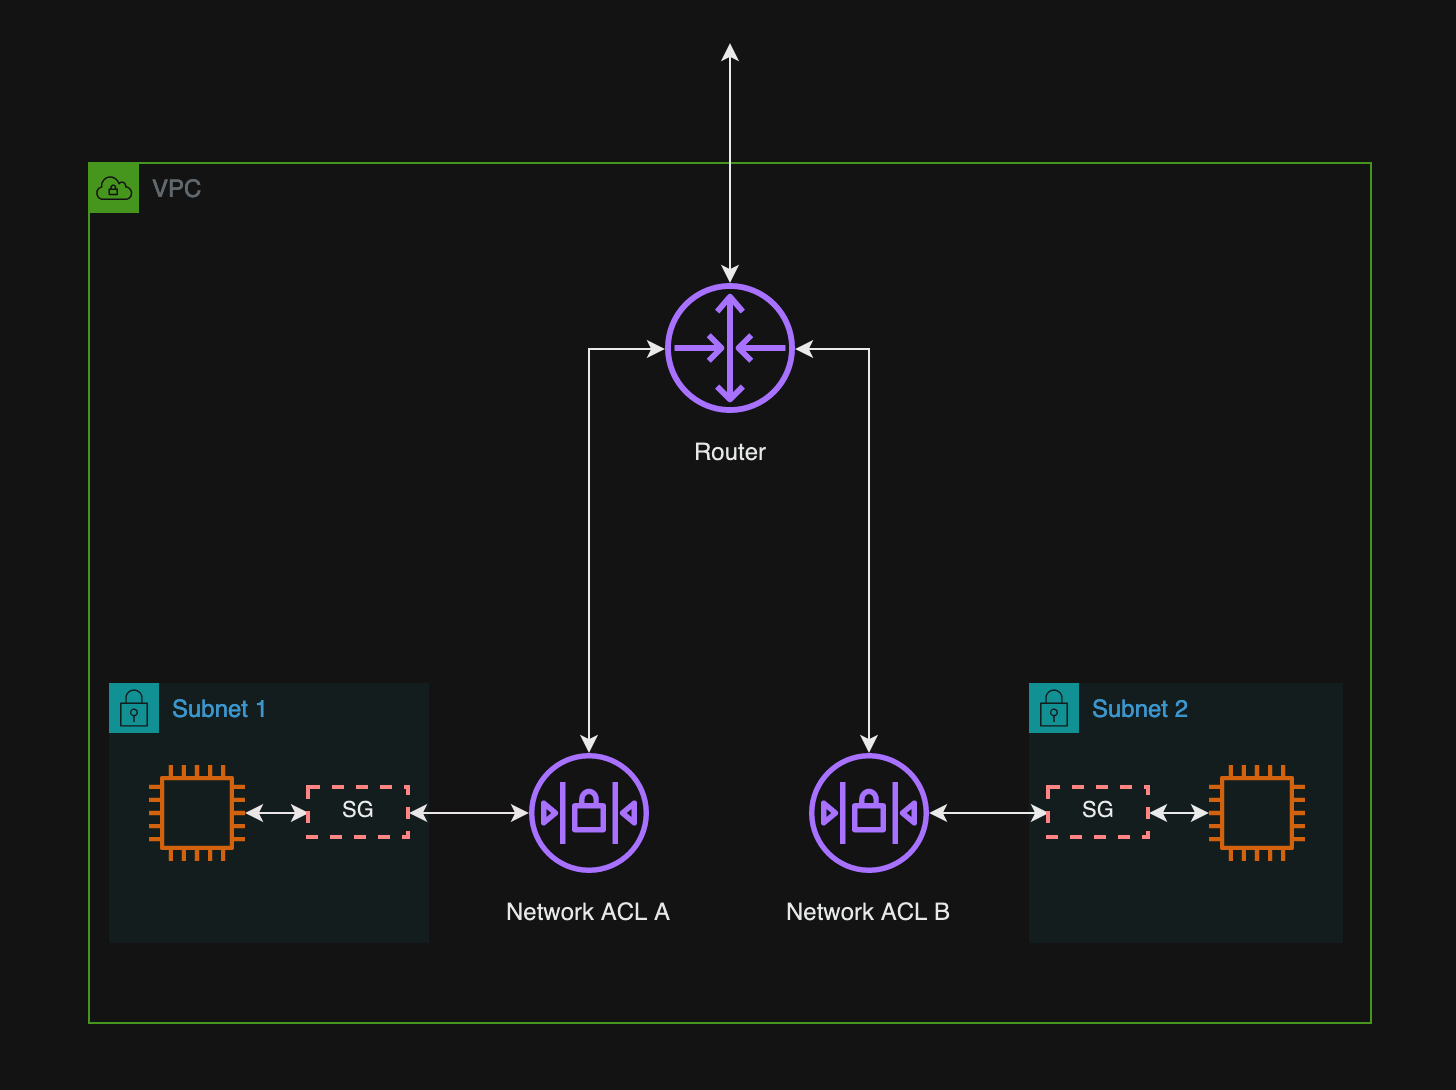
Network Access Control Lists work at the subnet level. Think of them as a firewall on the edge of each network (subnet) you create. A graphic below from AWS better depicts where they sit.
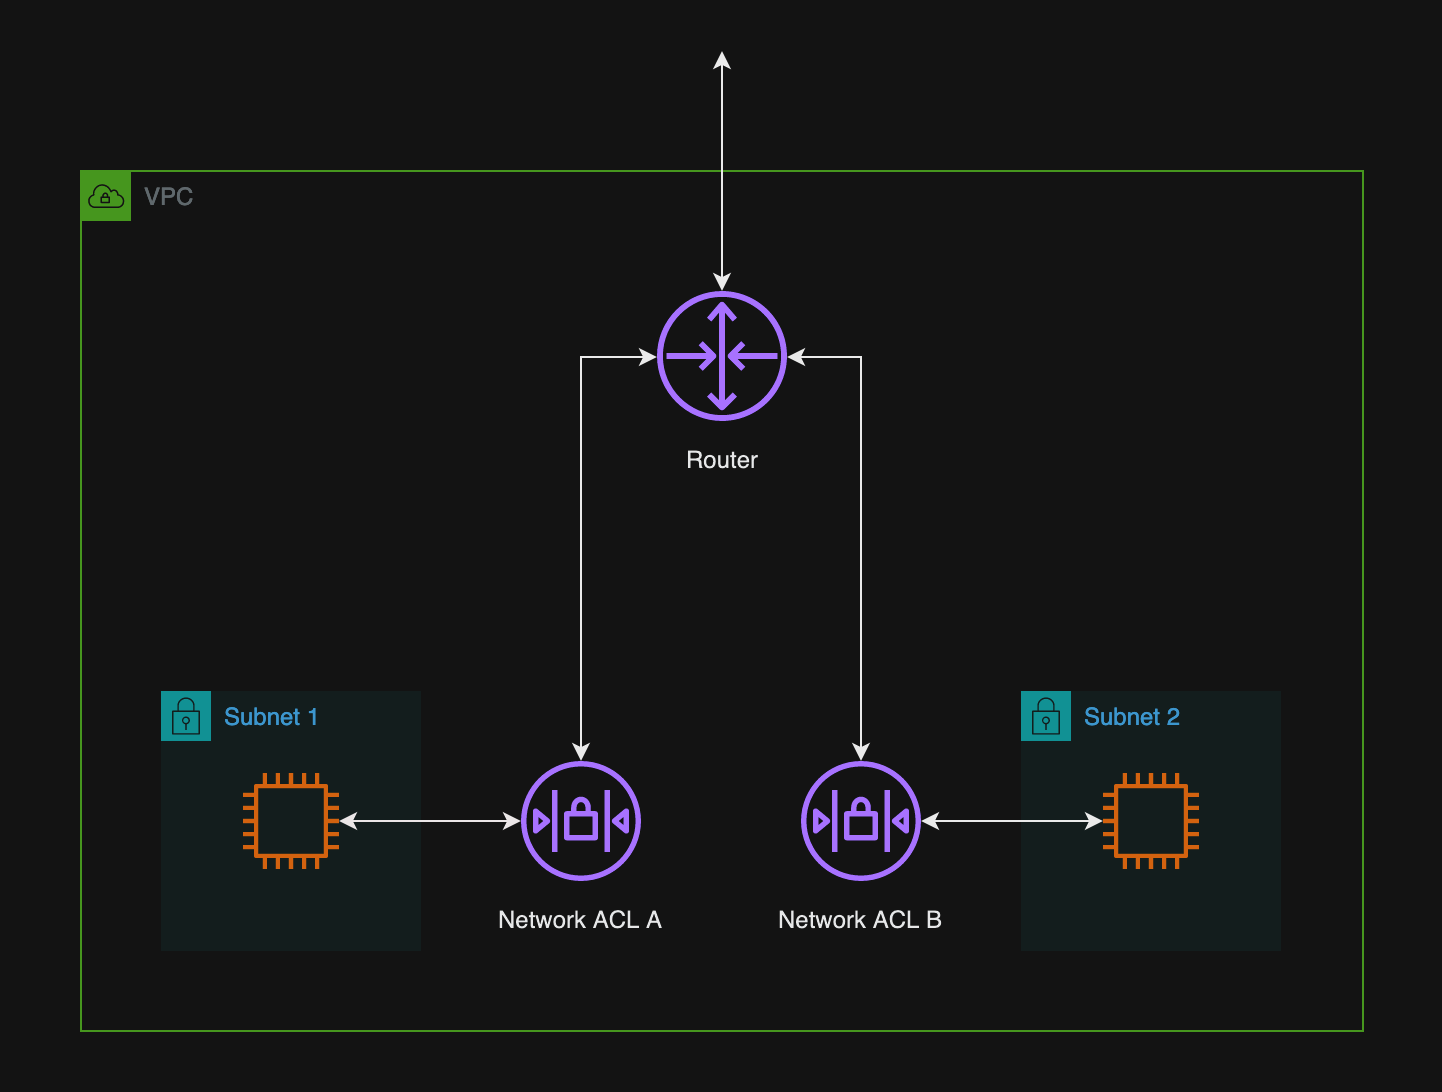
Network ACL rules are assessed in order of rule number. So, as you can see below, in our default NACL, SSH will be denied access to the associated subnets from everywhere. All other traffic will be allowed. The default rule, 100, is what we discussed earlier, where the default NACL allows all traffic. Although the image below shows the inbound rules, the outbound ones are identical.
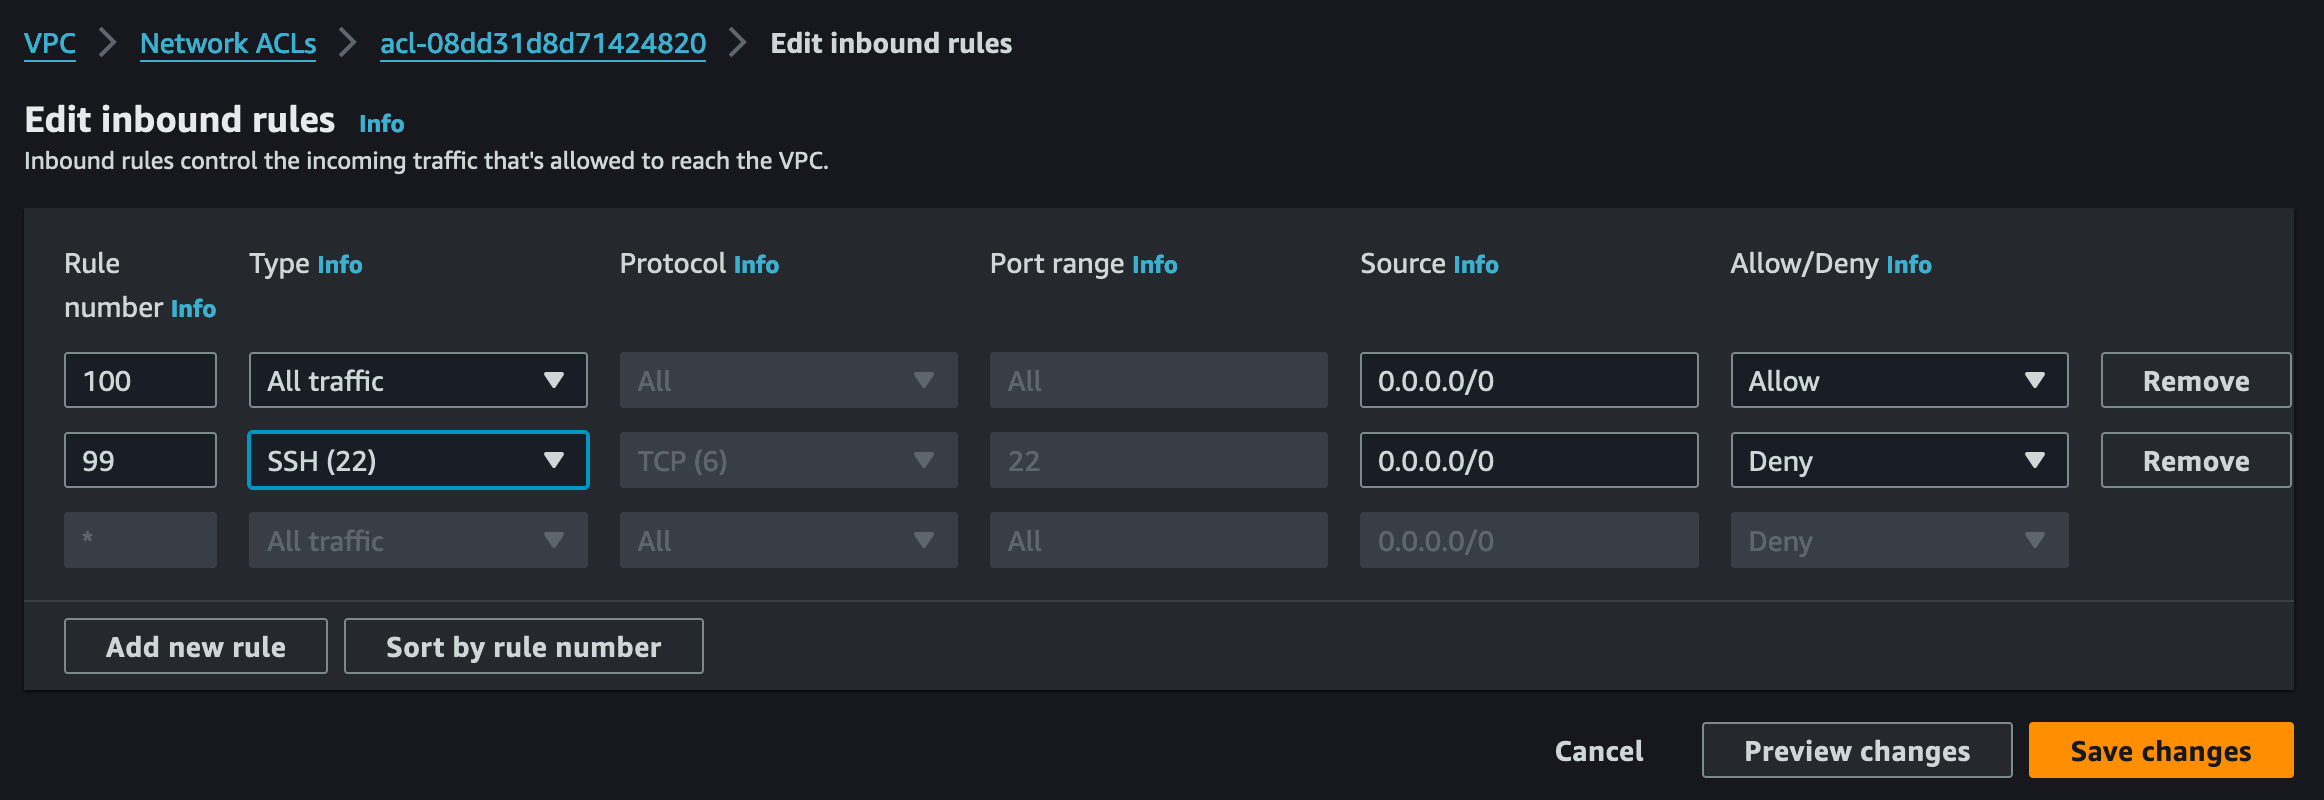
As you can see above, there is also rule (*). This rule ensures that it is denied if a packet doesn't match a rule. Since we have rule 100 that allows all traffic, the asterisk's rule will never be hit. Let's fix that.
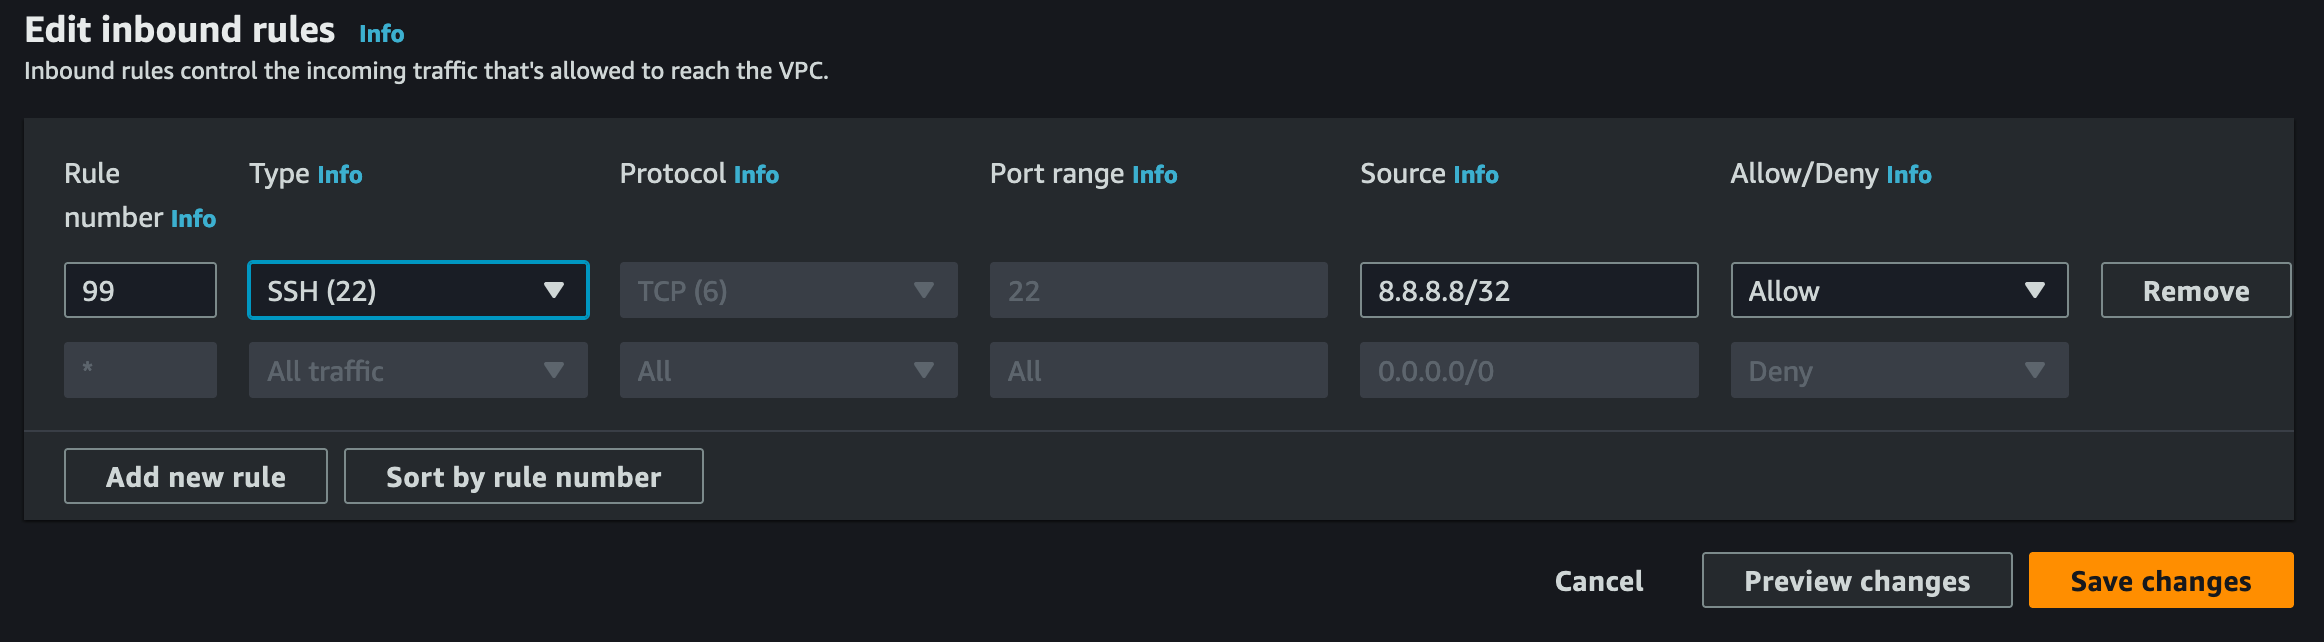
The above rule now only allows SSH in, on rule 99, from a source IP address of 8.8.8.8. All other traffic will hit the asterisks rule and subsequently be dropped. Again, remember to consider your outbound rules, as the above will allow SSH in but not out. Remember, they're STATELESS.
You see what subnets are associated with each NACL by clicking on each NACL and selecting "Subnet Associations". From here, you can associate subnets with new NACLs.
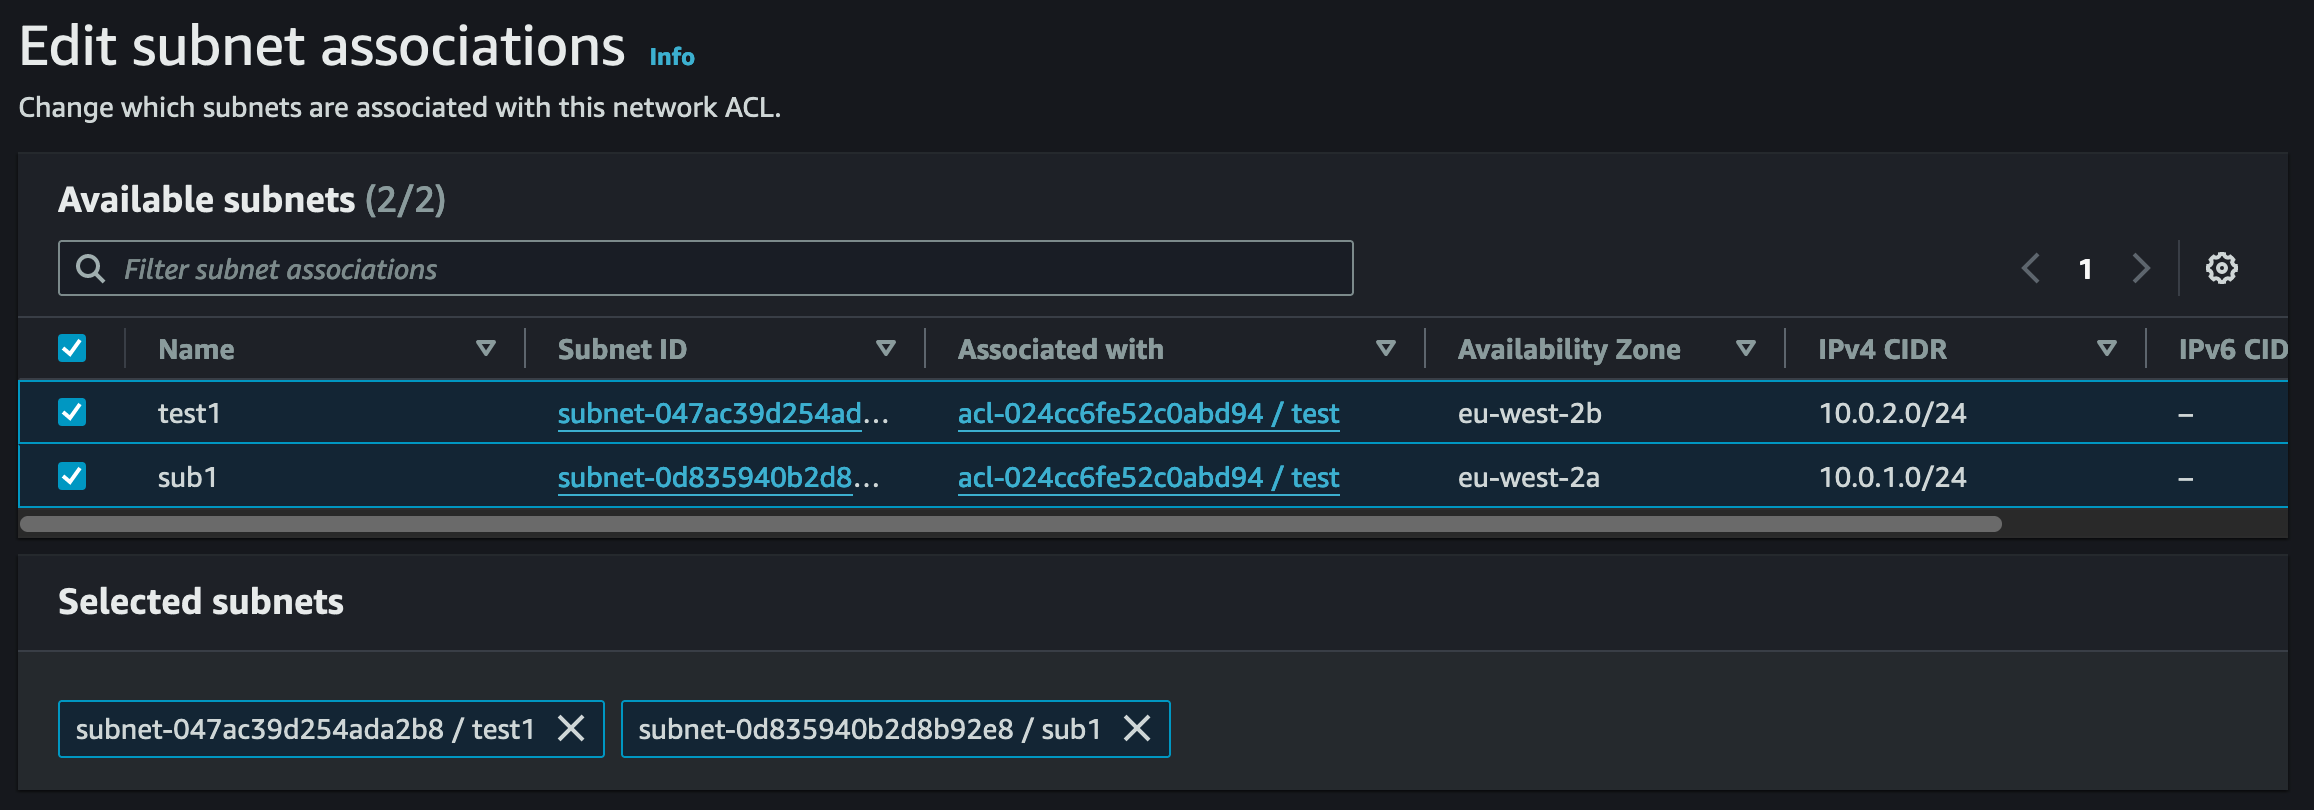
Network ACLs themselves can be associated with many subnets, but a subnet can only be associated with one NACL.
Key Takeaway Points;
- NACLs are stateless.
- They work on the subnet edge in a VPC.
- Default NACLs are open and cannot be deleted.
- Newly created NACLs default to deny all traffic under the asterisks rule.
- All newly created subnets are associated to the default NACL. Either lock your default NACL down or create a new Network ACL and associate the subnets you create to the new NACL.
- (*) is the final rule, where if there are no matches, all traffic is dropped, so no response is sent to the sender.
- Subnets can only be associated with one NACL.
Security Groups (SGs)
AWS security Groups act as a virtual firewall for EC2 Instances, databases, and other AWS resources. Security Groups are assigned to instances when they are created and can be modified or switched out at any time. Unlike NACLs, SGs are stateful, so they can monitor the state of active connections. What goes out can come back in, and what comes in can go back out, as long as your rules are set up correctly.
Security Groups are implicit deny, meaning all traffic is denied access unless the rules you create explicitly allow it. Keep this in mind when differentiating between NACLs and SGs.
When creating a VPC, a default Security Group is also created. These, like NACLs, default to allow all traffic in and out. It's best practice to create your own SG's with your own requirements, restricting access to only what's needed.
Below is an example of what a Security Group could look like. You have the ability to add as many rules as you require. In the example, we have a VPC, and in that VPC, we have a subnet associated with a route table that has a path to an Internet Gateway (more on these later), making the subnet public. We want to allow HTTPS access in from anywhere, so users can access our web application hosted on the EC2 instance in the public subnet. On the other hand, we only allow outbound traffic to 8.8.8.8, which is acting as an update server on the internet, we can carry out OS updates, etc. Remember, Security Groups are STATEFUL, meaning what is allowed in OR out can also return.

You can also reference other security groups in your inbound or outbound SG rules, but why would you want to do this? Let's clear something up first: referencing a security group inside another does not add rules from the source security group. So what does it do? When you call another Security Group inside another, traffic is allowed from the network interfaces associated with the source security group for the specified protocol and port. So, an EC2 instance, for example, that has an SG attached to it and the SG referenced inside of it is attached to another EC2 instance in the same or different VPC is now allowed to communicate.
Below is an example of where Security Groups sit in our diagram so far;
You can only attach one Security Group per compute/ instance interface. An EC2 instance itself can have multiple interfaces, and Security Groups can be added to multiple interfaces/ instances.
Key Takeaway Points;
- Security Groups are STATEFUL.
- Attached to instances and act as a virtual firewall for the interface connected.
- Default SGs are open and cannot be deleted.
- Newly created SGs default allow all outbound traffic, but not inbound.
- You can reference a Security Group within another Security Group to allow communication between instances that have the source SG attached.
- You can only attach one SG to an interface/ instance.
- Security Groups can be attached to multiple interfaces.
VPC Addressing
When creating a VPC in AWS, you specify the IPv4 CIDR block you'd like to utilise. Now, please keep in mind that you could, in the future, run up hundreds to thousands of VPCs across multiple accounts and planning your addressing schema is important early on. The allowed block size when creating a VPC in AWS is between /16 and /28, no larger, no smaller.
As per AWS documentation, it's recommended that you do not use the CIDR range 172.17.0.0/16 to avoid potential future conflicts. Some services, such as Cloud9 and SageMaker, can experience IP address conflicts in this range.
When thinking about your schema, it's important to be mindful of these limitations to conserve addressing and making efficient use of your ranges. Some services like EC2 can be auto-scaled out, consuming more addresses, so try to tighten down your subnets but ensure enough room for scaling, future use, etc.
There are a few considerations you must keep in mind when building out your IP address schema in AWS. As a network engineer, you're familiar with addresses in IPv4 network ranges that cannot be used;
- First IP address - Network address
- Last IP address - Broadcast address
In an AWS VPC, there are five addresses per subnet you must be aware of and consider. Some of these are, as you expect, the broadcast and network address, but AWS also reserves some. In the below example, we'll use the VPC CIDR of 10.0.0.0/16 and the subnet CIDR of 10.0.1.0/24. In the case of AWS, the first 4 IP addresses and the last IP address of each subnet are unusable. These are;
- First IP address - 10.0.1.0 - Network address
- Second IP address - 10.0.1.1 - Reserved by AWS for the VPC Router
- Third IP address - 10.0.1.2 - Reserved by AWS for the DNS server (we cover this later)
- Fourth IP address - 10.0.1.3 - Reserved by AWS for future use
- Last IP address - 10.0.1.255 - Broadcast Address
While we're on the subject of IP addressing, it is also important to note that AWS makes public the IP address ranges they use/reserve. You can find this here.
Key Takeaway Points;
- There are 5 IP addresses reserved in each subnet: the first four and the last address.
- Avoid the use of CIDR range 172.17.0.0/16
- Ensure thorough planning of your AWS IP addressing schema, considering scaling and future use.
VPC Route Tables
Route Tables in AWS are where you stipulate how traffic is routed inside and out of a subnet. Traffic that leaves a subnet is defined as traffic destined to that subnet's gateway (VPC) router's MAC address. Your VPC has an implicit router, and you use route tables to control where network traffic is directed. You have no control of this router or visibility; know it's there, and it takes your route tables.
Each subnet in your VPC must be associated with a route table, which controls the routing for the subnet (subnet route table). You can explicitly associate a subnet with a particular route table. Otherwise, the subnet is implicitly associated with the main route table. You can change the main route table at any time by simply specifying the route table you want as the main route table.
A subnet can only be associated with one route table at a time, but you can associate multiple subnets with the same subnet route table. When first creating a subnet, it will be implicitly associated with the main route table unless changed later.
When the VPC Router looks at traffic and determines where to pass it, it uses Longest Prefix Match Routing. So, the most specific route will be where the traffic is routed.
In the next section, we go into more information on route tables and their application.
Internet Gateways (IGWs) and Public/ Private Subnets
Internet Gateways are the gateways to the internet in your VPC, but it's a little more complicated than that. IGWs are a horizontally scaled, redundant and highly available component in VPCs, which is invisible to you as the customer. When you place a single IGW into your VPC, behind the scenes, based on demand, or any issues, the IGW will always be able to provide you internet access to your VPCs.
These Internet Gateways provide internet access not only for IPv4 traffic but also for IPv6 traffic. But how do they work?
In AWS, there is the concept of public and private subnets. The key difference between these is that a public subnet has a route in its associated route table to an Internet Gateway. A private subnet is a reverse; its subnet is not associated with a routing table with a route to an Internet Gateway.
Let's clarify our diagram by removing the NACLs and SGs, as we've discussed them and the VPC Router. We don't need the VPC Router there anymore, it's an implicit device, where we use route tables to control where the traffic is directed.
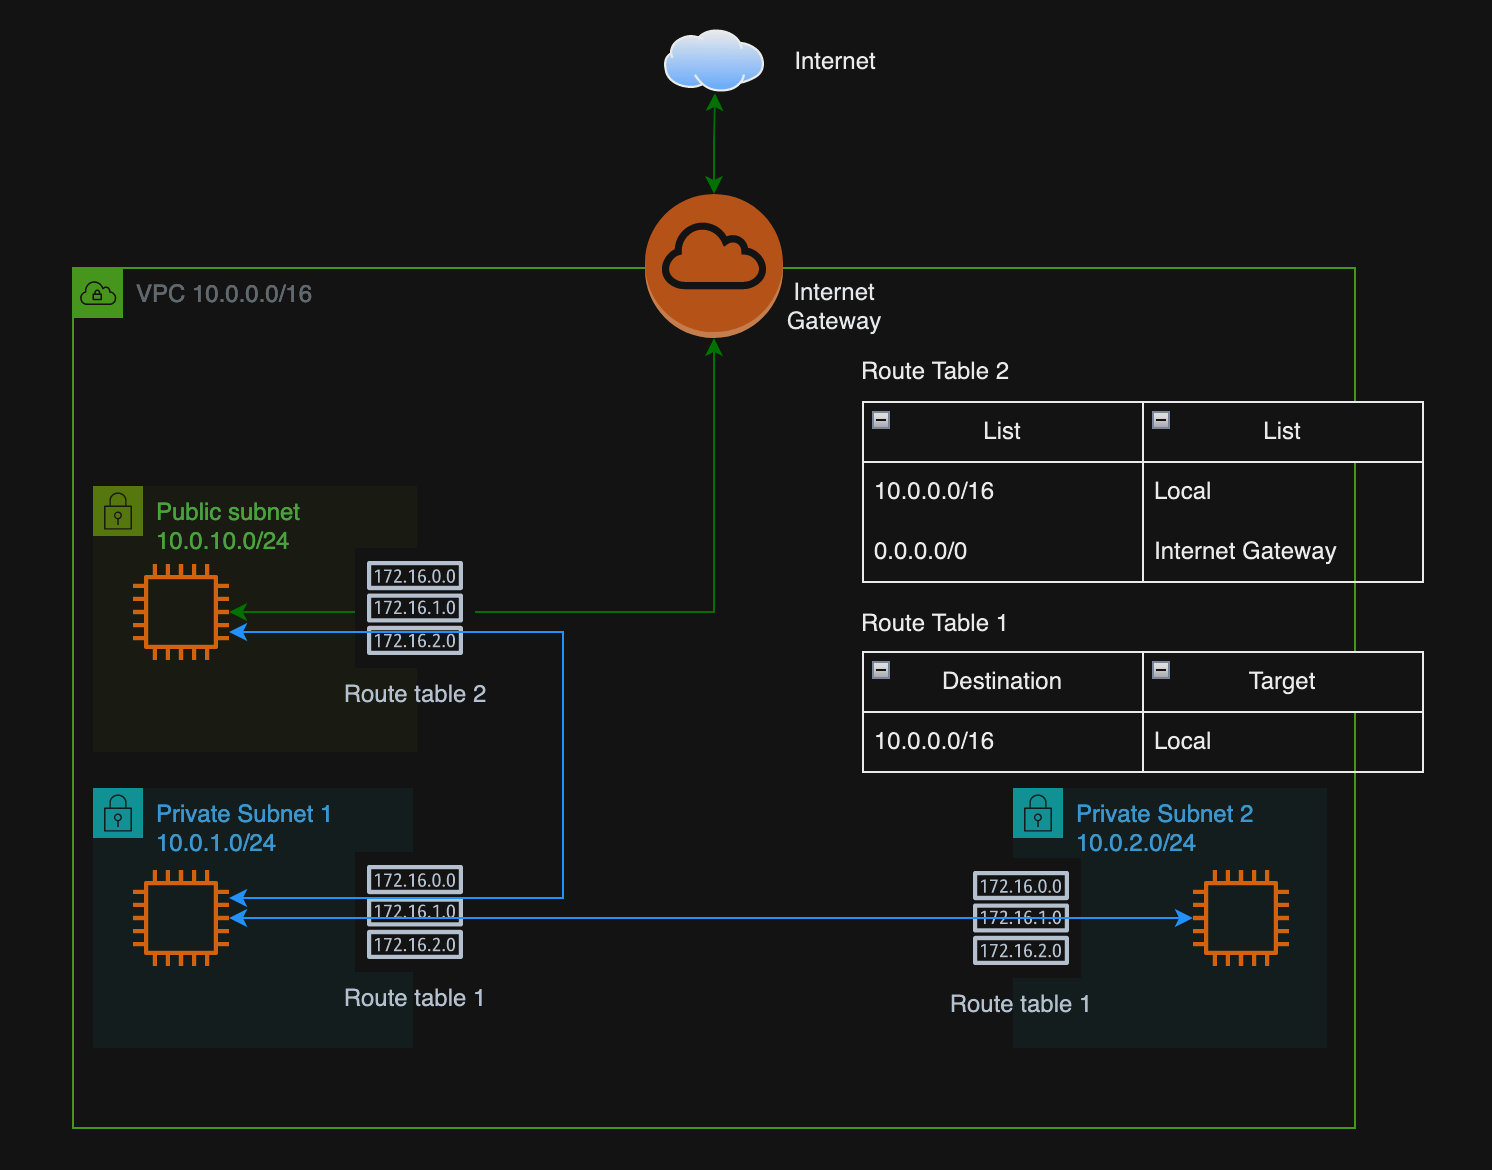
As you can see, we created a new public subnet, 10.0.10.0/24. We have also created 2 Route Tables, RT1 and RT2. RT1 is explicitly associated with Private Subnets 1 and 2, while RT2 is associated with the Public Subnet.
So, how do they work? As we can see, in both Route tables, we've added a route to the 10.0.0.0/16 network, which is the VPC network CIDR range we apply to create the VPC but split the networks further into /24 ranges. The destination routes 10.0.0.0/16 of Local tells the VPC Router to route all traffic destined for this range locally, meaning all subnets can now communicate with each other locally (if the NACLs and SGs were open). The Public Subnet has an additional route to the Internet Gateway. So, any traffic that matches the other routes is sent to the Internet Gateway to deal with. The IGW will then pass this traffic to the wider internet.
Internet Gateways work for both inbound and outbound traffic, so as long as your resources have a public IP, there is 2-way communication. As mentioned above, though, we can see our EC2 Instance in the public subnet still has a private IP address, so how can it reach out to the internet and vice-versa?
An Internet Gateway is essentially doing 1-to-1 NAT. When you create an instance in a public subnet, you can auto-assign a public IP to that instance (to the interface).
That public IP address is not visible to the EC2 Instance itself, and the underlying Operating System has no idea it exists. All the IGW is doing is creating a 1-to-1 entry behind the scenes to NAT the private IP address of that instance to one of the public IPv4 addresses available. The IGW deals with the rest. An Internet Gateway can host a nearly unlimited amount of public IP addresses, within reason, of course.
What if we don't want to allow public internet access into a subnet and only allow access out, especially for resources in a private subnet that need to be updated over the internet? This is where NAT Gateways from AWS come in, but a little more on that in a later post in the series.
Elastic IP addresses
Since we're on the topic of public IP addresses, it seems fitting to jump into what an Elastic IP address is in AWS. When creating a resource in a VPC, such as an EC2 instance, an interface is created alongside it, with a public IP address if required. Outside of this, you can freely create and configure Elastic IPs.
An Elastic IP Address is a static IPv4 address assigned by AWS, designed to be dynamic in nature. What we mean by this is that when you create and associate an Elastic IP Address in your account, you're free to associate that Elastic IP with any instance/ resource in any VPC in your account.
Why would we do this? When you auto-assign a public IP to your instance, that IP address will last as long as the instance but cannot be moved. Another thing to consider is when an EC2 instance is shut down, it will lose that IP address that was auto-assigned, and a new IP is generated on startup (reboots of an instance will keep the same IP). With an Elastic IP, you can mask the failure of an instance by rapidly remapping the address to another working instance in your VPC.
Egress Only Internet Gateways
IPv6, as we know, doesn't require NAT to converse with the wider internet. Addresses in the IPv6 space are public by default. So, an Internet Gateway will still allow internet access in and out of your VPC to a Public Internet; the IGW will simply not NAT the address.
What if we don't want to allow internet access into those subnets working on IPv6? This is where an Egress Only Internet Gateway comes to help. An Egress-Only Internet Gateway does exactly what it says: Egress-only Internet. Working like IGWs in the route tables, we create a destination "::/0" route to target the Egress-Only Internet Gateway.
Key Takeaway Points;
- Internet Gateways allow access to and from the internet on your public subnets.
- IPv4 public subnets are defined by having a Route Table entry pointing to the IGW.
- IPv4 private subnets are defined by not having a Route Table entry pointing to the IGW.
- IPv6 addresses can be restricted access from the internet by utilising an Egress Only Internet Gateway.
- IGWs provide a 1-to-1 NAT to your private IP addresses where you have stipulated on the resources you want them to have public internet access.
- Elastic IP addresses can be re-associated to another instance/ interface at any given time, allowing you to retain the same IP address.
Regions and AZs (Availability Zones)
You may have heard the terms "scalable" and "highly available" when talking about the cloud, but what does this mean in the world of AWS? When considering your network design in AWS, it's important to think about the concept of Regions and AZs (Availability Zones) and where they fit in.
Regions in AWS
AWS Regions themselves are geographically separate areas in AWS. Some of them are listed below;
- EU-West-2 - London
- EU-West-3 - Paris
- US-East-1 - North Virginia
When working with AWS, you can stipulate where your resources are being created in a specified region. As you can see in the image below, we're working in the London region (EU-West-2) but have the choice to work in others, allowing you to deploy resources anywhere you choose globally.
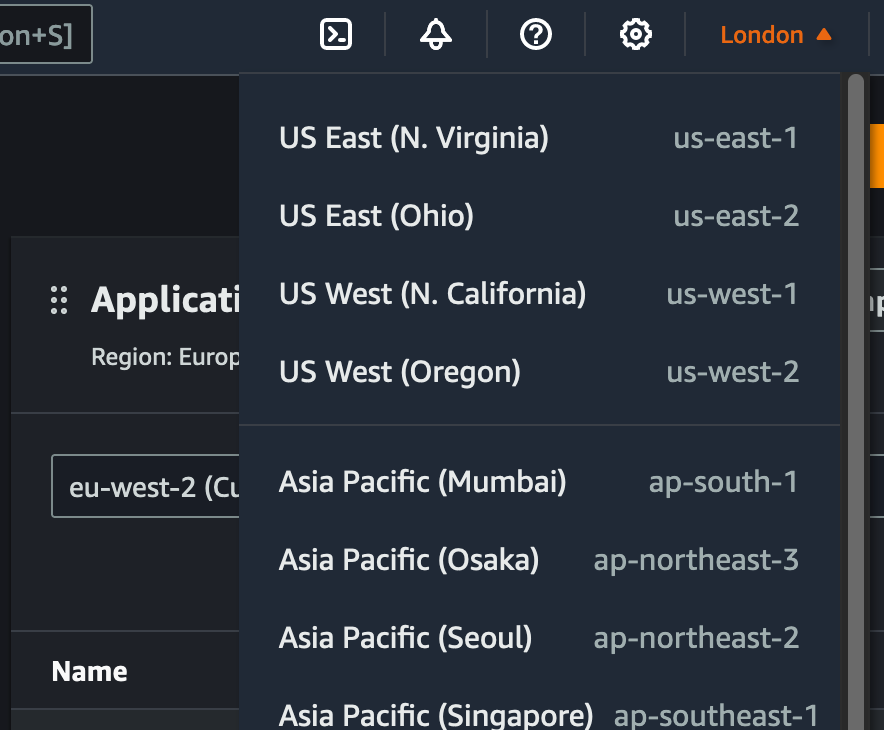
When viewing resources in your AWS account, be sure to select the correct region where your resources are located. Resources Located in the region London will not appear in your console if you're working in North Virginia, for example.
Availability Zones
Regions are pretty straightforward. Select the region you wish to work with and commission your resources as you wish. So why are Availability Zones an important topic? This is where you can scale and make your resources highly available.
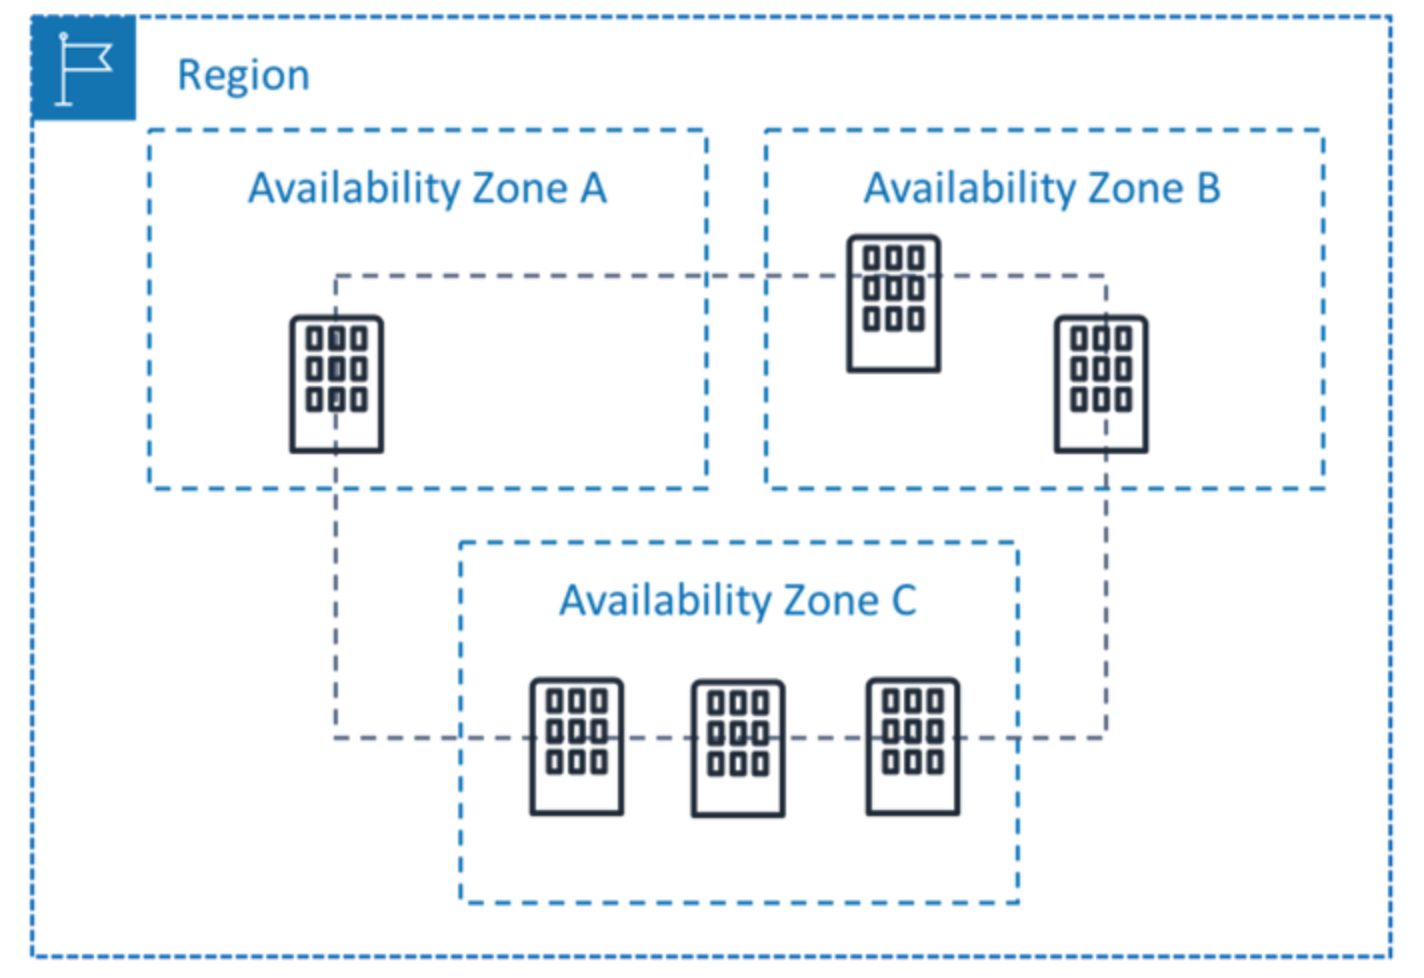
Inside an AWS Region, you have Availability Zones, and in each of these Availability Zones are independent data centres operated by AWS, each with its own redundant power, networking and connectivity. These can range from one to many data centres.
When creating resources, you'll be asked to stipulate what AZ you wish to place them in, this can be done with AWS' managed resources you place or EC2 instances for example, where you will place them in a particular subnet. The subnets that you create in a VPC will belong to a particular AZ that you specify. Let's plan this out:
- EU-West-2 Region
- VPC Address: 10.0.0.0/16
- Subnet 1: 10.0.1.0/24
- Availability Zone A
- Subnet 2: 10.0.2.0/24
- Availability Zone B
- Subnet 3: 10.0.3.0/24
- Availability Zone C
- Subnet 1: 10.0.1.0/24
- VPC Address: 10.0.0.0/16
As you can see, we've created three /24 networks, each in their own AZ. You can create multiple subnets per AZ, creating all sorts of network designs. When creating resources in these subnets, be mindful that we're placing them into single AZs, which in themself are redundant, but if an AZ drops out, you will lose your resources in that AZ.
Let's say we're creating a web application to be hosted for the public. We want to ensure there is AZ-level redundancy so that if an AZ is suddenly lost, we can spread the load to another AZ using AWS ELBs (Elastic Load Balancers).
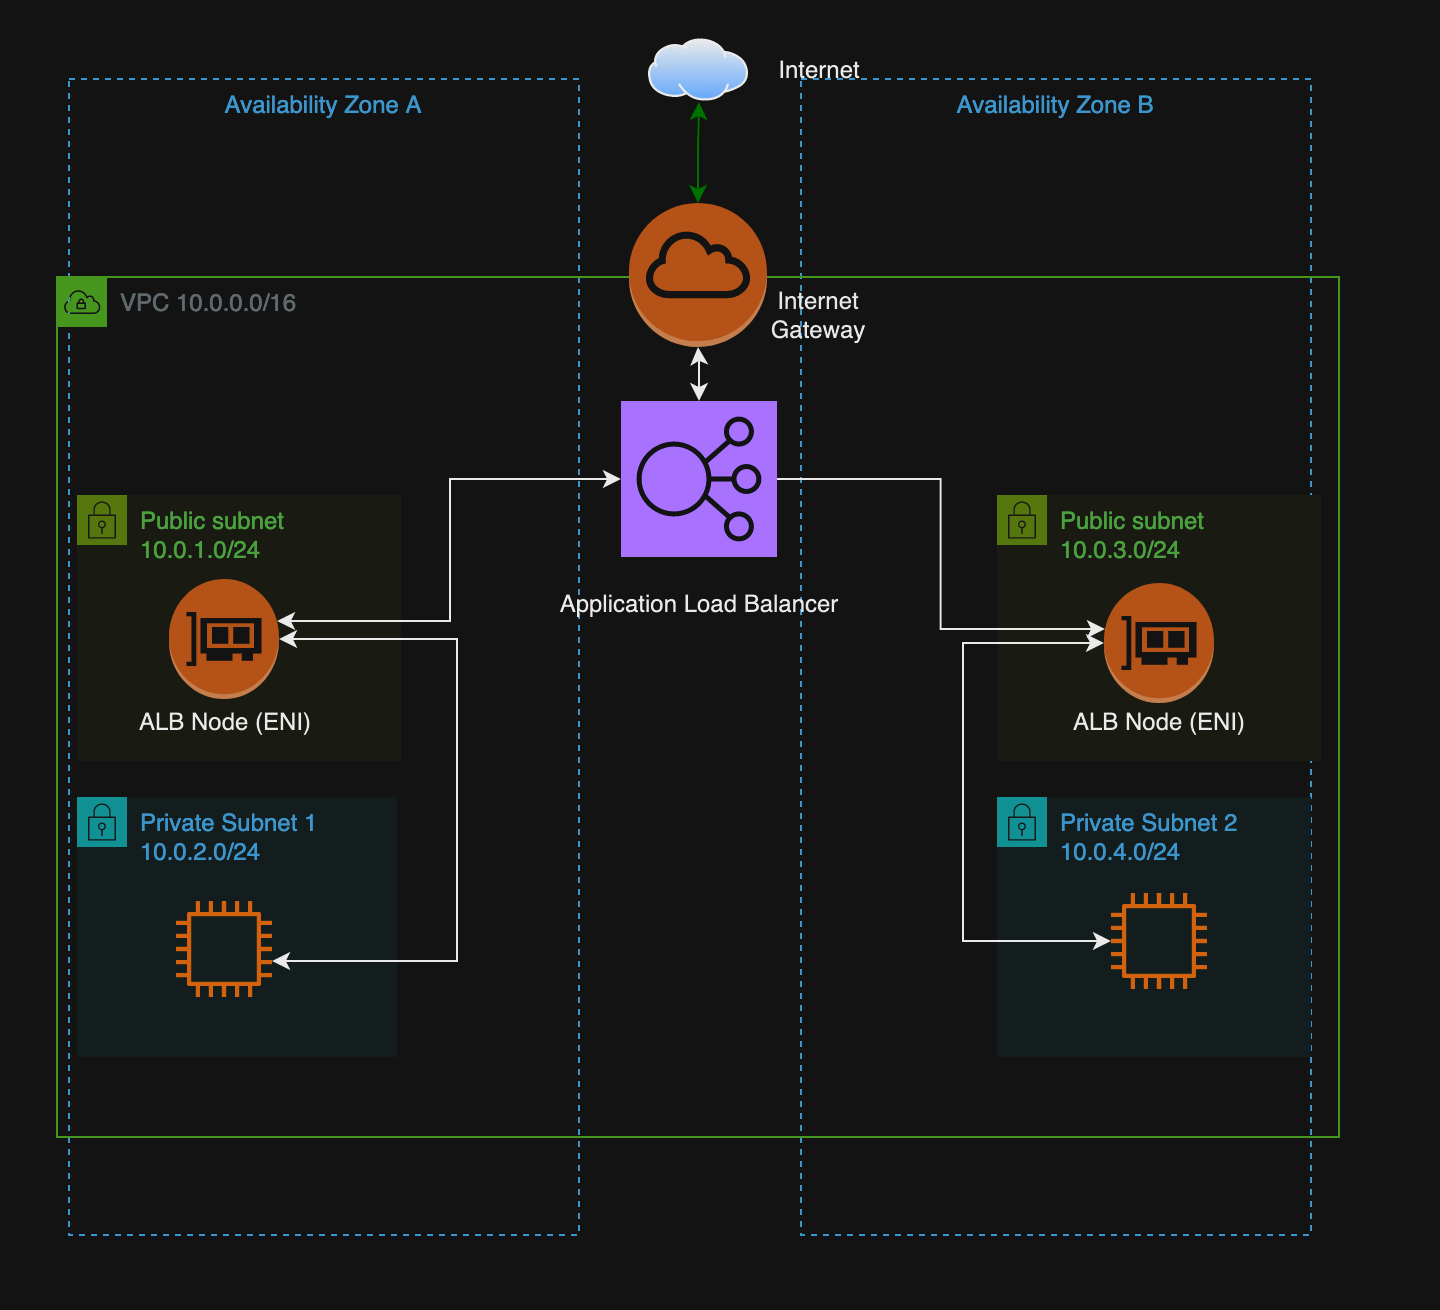
The above is very much a high level of what we're doing. We would ensure routing tables are correct, Security Groups are set, etc.
We're creating two subnets in each AZ, one private and one public. AWS Elastic Balancers (we dive into how these work in a future post) are an AWS Managed Service; we then place Nodes/ENIs (Elastic Network Interfaces) in each subnet where we want the capability. When traffic reaches the load balancer, we have the ability to share the load of the incoming traffic to our web applications on the EC2 instances in their private subnet; this way, we're not exposing the instances to the internet and only allowing access through the Load Balancer.
If AZ A were to fail, we would still have service running through AZ B. There are further ways to build on this, such as auto-scaling groups and more, but these topics will be saved for a future post.
Note
As a note, the above would not allow the EC2 instances to connect to the internet, so any updates that may be required for these systems would require further engineering, potentially looking into NAT Gateways (a further post will detail these).
Key Takeaway Points;
- AWS Regions are geographically separated areas in AWS.
- AWS Availability Zones are 1 to many Data Centres in each region.
- AWS Availability Zones allow you to disperse resources in case of a single AZ failure, allowing full redundancy for your application.
VPC Peering
We won't dive into VPC Peering in this article, as I recently put out an informative blog post about VPC Peering and Transit Gateway, which can be located here. However, we will go into more examples in future articles in this series as we look at other aspects of network engineering in AWS.
Conclusion
I hope that with the above, we can now understand most of the core concepts in networking related to VPC-level technologies. In the next article of the series, I'll be going through creating a VPC and resources that you should be familiar with as a network engineer working in the cloud. I've decided to omit it from this post and schedule it for a further post due to the current length of this article.
Further posts in the series will include;
- BGP, Transit Gateway, VPC Peering, Endpoints, Private Link, Direct Connect, VPN and other Connectivity Technologies.
- Route53 and DNS (DNS Zones, Traffic Management/ Distribution in Route53, etc)
- Load Balancers and NAT Gateways
- Traffic Capturing and Monitoring in AWS
If you have any questions, please do let me know! Always happy to take feedback.
Chapter 1 - The Building Blocks of Cloud Networking
Chapter 2 - VPCs - A Guide for Network Engineers
Chapter 3 - Routing and Connectivity in AWS - Part 1
Chapter 4 - Routing and Connectivity in AWS - Part 2 (Coming Soon)


