My homelab project started with the simple goal of hosting some home applications, but it soon escalated into the more complex system I have now. I aim to walk you through my thinking and other details in this blog post.
The Beginning
The original plan involved setting up a Raspberry Pi 5 to run AdGuard Home, enabling DNS filtering and internal DNS mapping. Throughout the setup, I encountered consistent temperature problems with the Pi, a combination of the case, power consumption, and thermal performance differing from earlier models. With this in mind, however, I was trying to plan for long-term use and the thought of using Proxmox again sprung to mind.
The major problem being that Proxmox doesn't support ARM. Although there are a few unofficial versions out there, built by the community, I'm skeptical of not utilising official channels for release, updates, and any oddities that could come along with it in the future.
So, I looked elsewhere. A different machine to run Proxmox, and potentially scale out with additional clusters if ever required.
Some of the primary requirements of this setup are:
- Ability to cluster (and fail over critical apps to another cluster on failure).
- Network isolation from the primary home network.
- Easy backups and restoration.
- Quiet.
- Set and forget (auto updates, monitoring, alerting).
Intermediary Results - Big vs Small
Initially, I looked at using a desktop that I repurposed some time ago for the use of EVEng and Cisco CML (networking labs). With 10TB of storage, an i7 10th Gen processor and 64GB of RAM, it seemed more than ideal. So I set off to install Proxmox on it.
Nothing unexpected happened. All worked as planned, but what I had then done, unintentionally, was add another goal to the setup. Energy efficiency.
See, the issue with the full-size desktop I had running, is it was consuming roughly 50w on idle, just chugging along with Proxmox running. No containers, No VMs, nothing special. So, I saw what Micro PCs were available in the refurbished/second-hand market, what the homelab/self-hosted communities recommended, and then work from there.
It was in these communities I found my answer. A Dell Optiplex Micro desktop.
These we pretty popular, because of their reliability, low noise, low power, upgradeability and form factor. Being easily stackable also fitted into my earlier idea that in the future, I may want to expand with clustering.
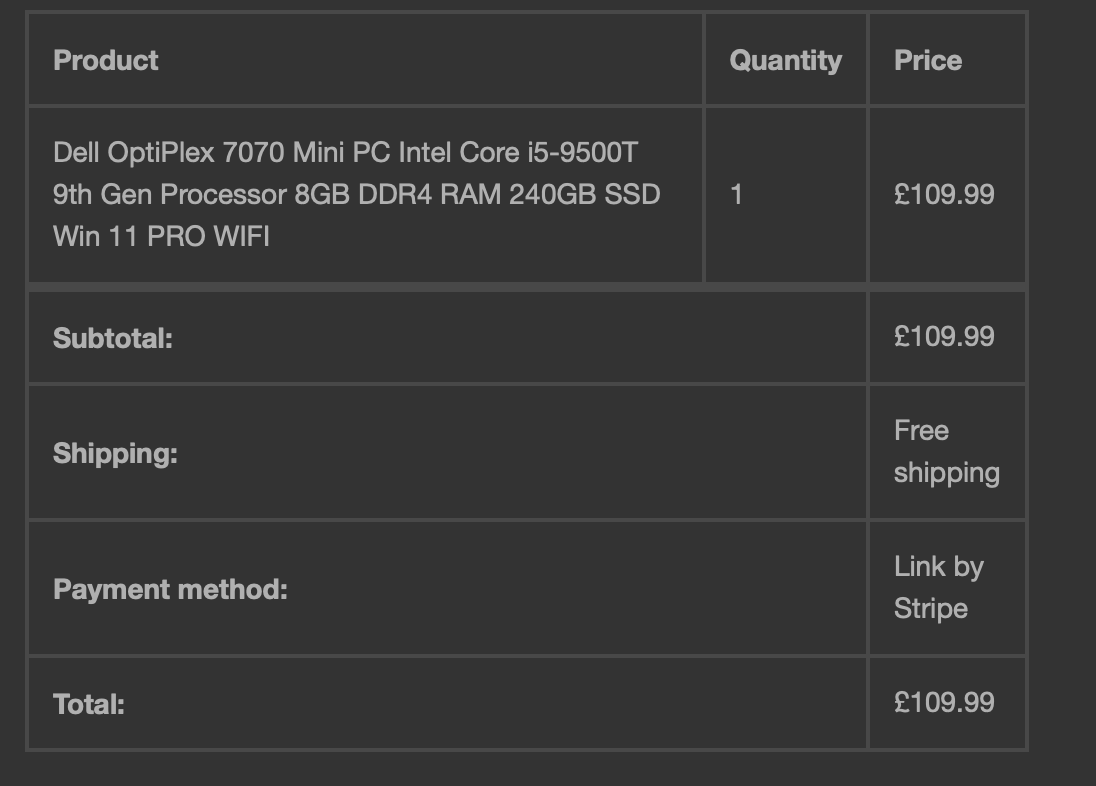
I settled on a barebones Dell Optiplex 7070 with an i5-9500T. Purchased from Computer Clinic Ilford, they were quick and delivered the goods as to be expected. Device was in fantastic condition and couldn't ask for more from them.
The Dell Optiplex 7070 - Delivery and Upgrades
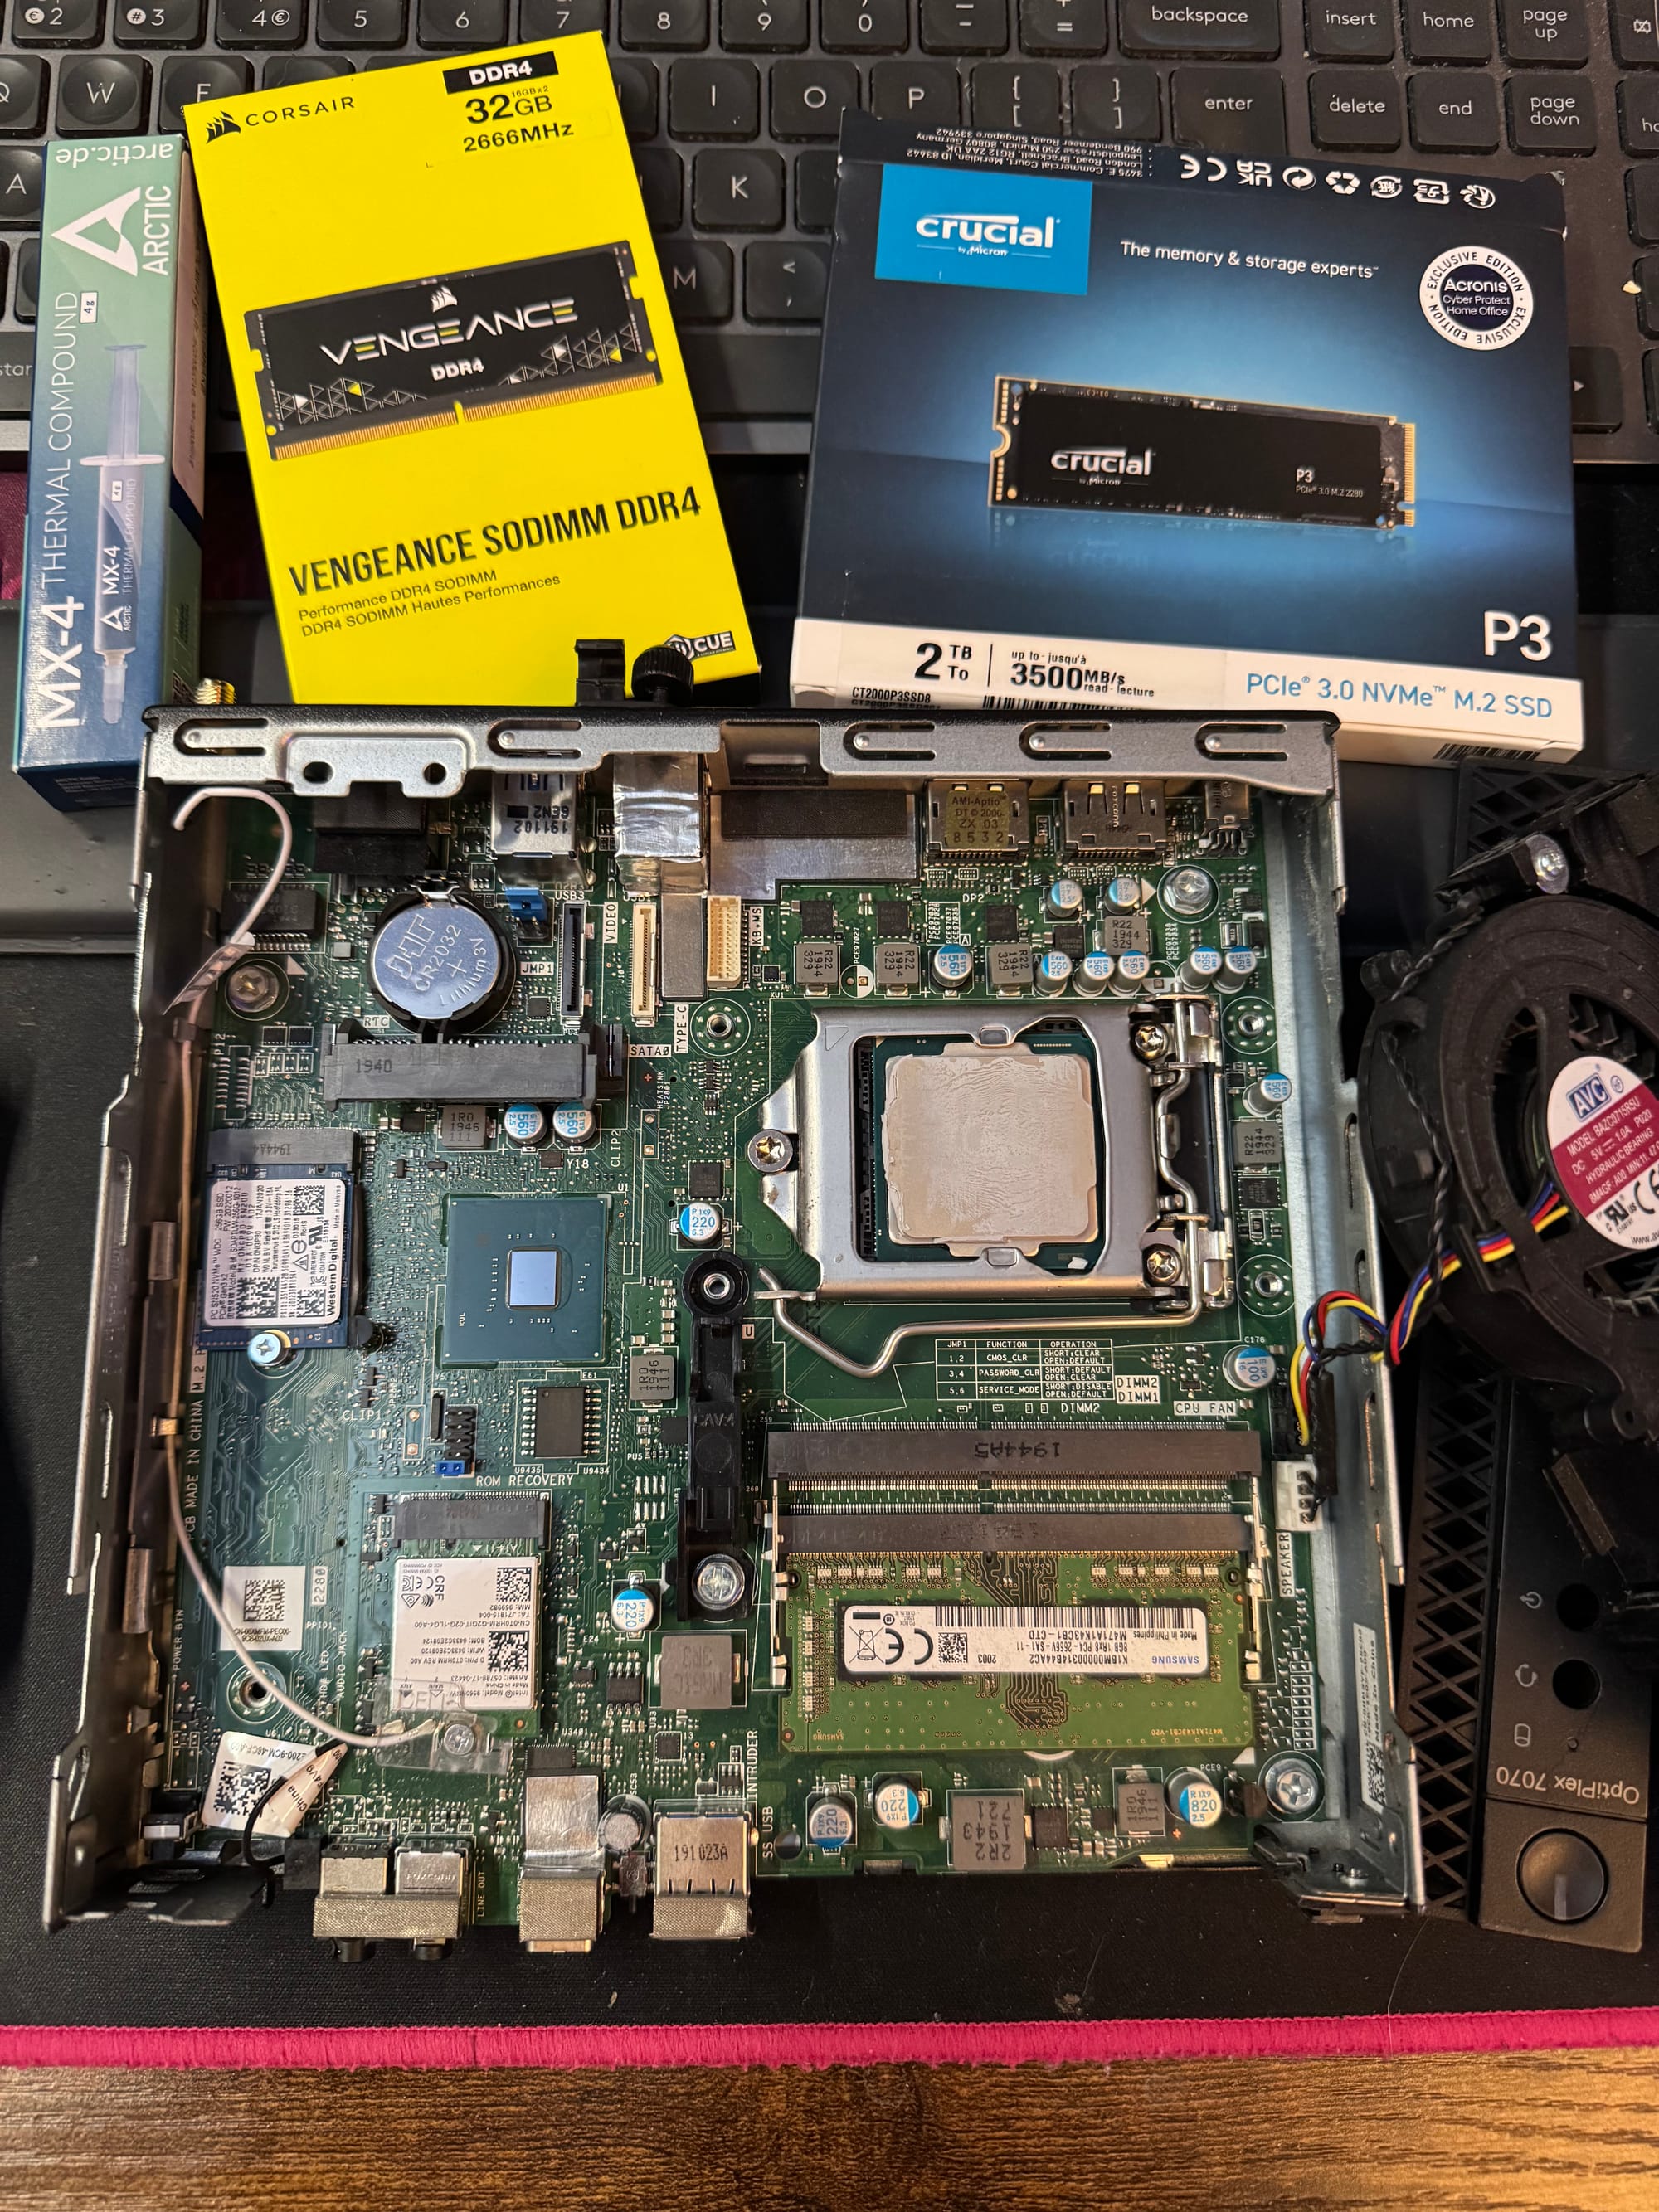
While waiting on the delivery of the 7070, I got some upgrades ready for the new arrival. For just a little over £120, I could snag 32GB of DDR4 RAM and a 2TB NVME SSD, which would be more than ample for current and future requirements.
Upon its arrival, the 7070 was ready for its new upgrades and enhance its power. While I was there, it felt needed to replace the thermal paste to enhance thermal levels.
Once put back together, it was time to get it in its place. On top of the repurposed desktop, it was due to replace.
Installing Proxmox was a breeze, and it was up and running within half an hour.
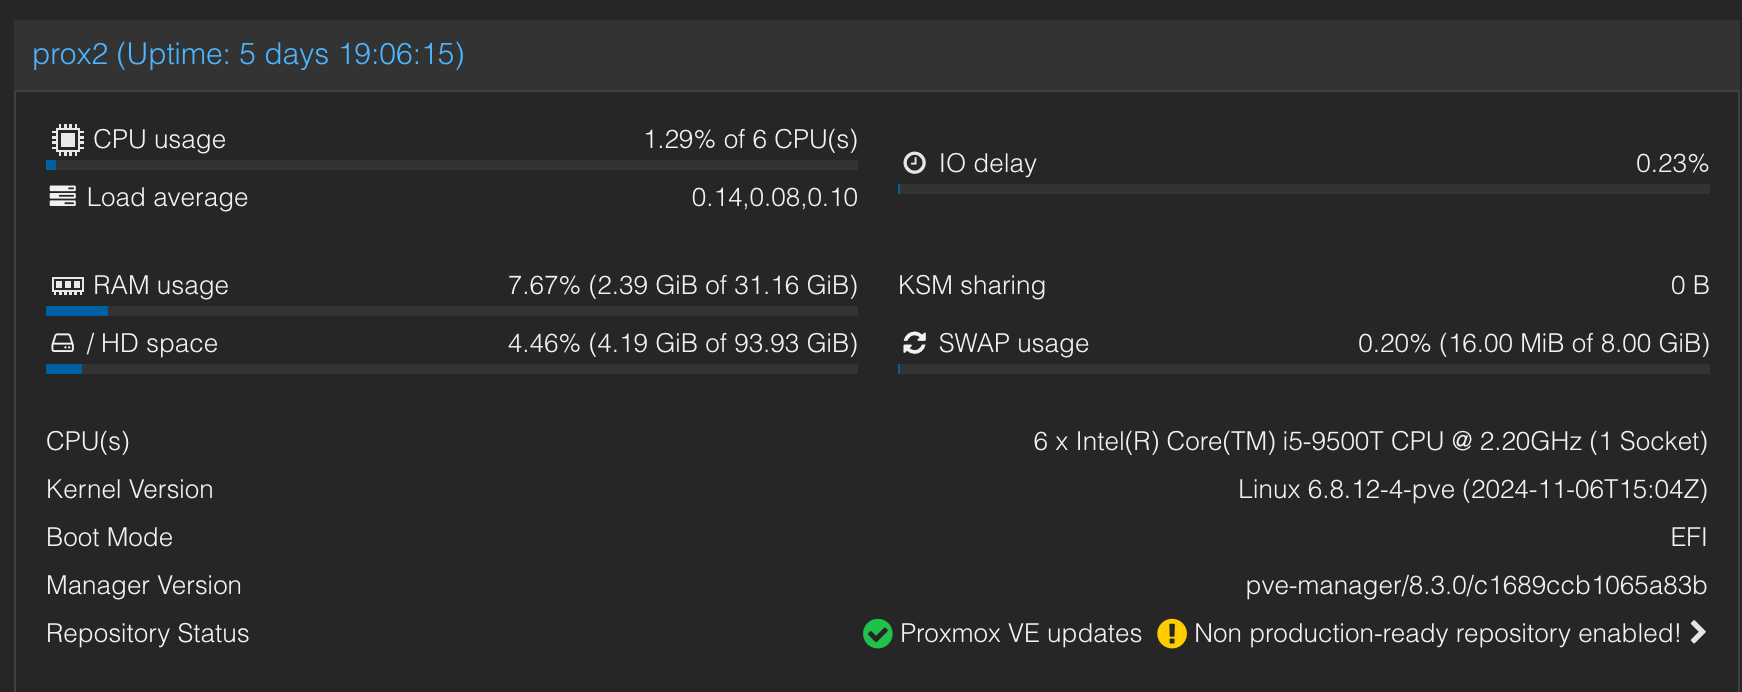
What was unexpected, however, was the low wattage consumption. Running at idle, it was consuming approx. 9-11 watts of power, which is a significant amount less compared to our earlier results on the full size desktop consuming roughly 50w at idle. Granted, the desktop has 2x4TB HDDs and 1x2TB HDD, but that shouldn't consume much, as we'll get onto later when we look at NAS options.
So now we have the basics up and running, let's dive a little deeper.
Network Isolation
One of my primary requirements was isolation of the network from my main home network. Since we're using Unifi for the network, this makes things simpler since Unifi includes a network isolation toggle. Toggling this option prevents all access in an out of that network (VLAN), thus isolating it. The problem with this is we require some connectivity into the VLAN where Proxmox is located from the primary home network (VLAN1) (SSH into the prox nodes, DNS through to AdGuard, etc).
So, it was pretty straightforward.
- Block all (new) Traffic from VLAN2 (Self hosted Network) > VLAN1 (Home Network)
- Allow SSH, DNS and HTTPS from VLAN1 > VLAN2.
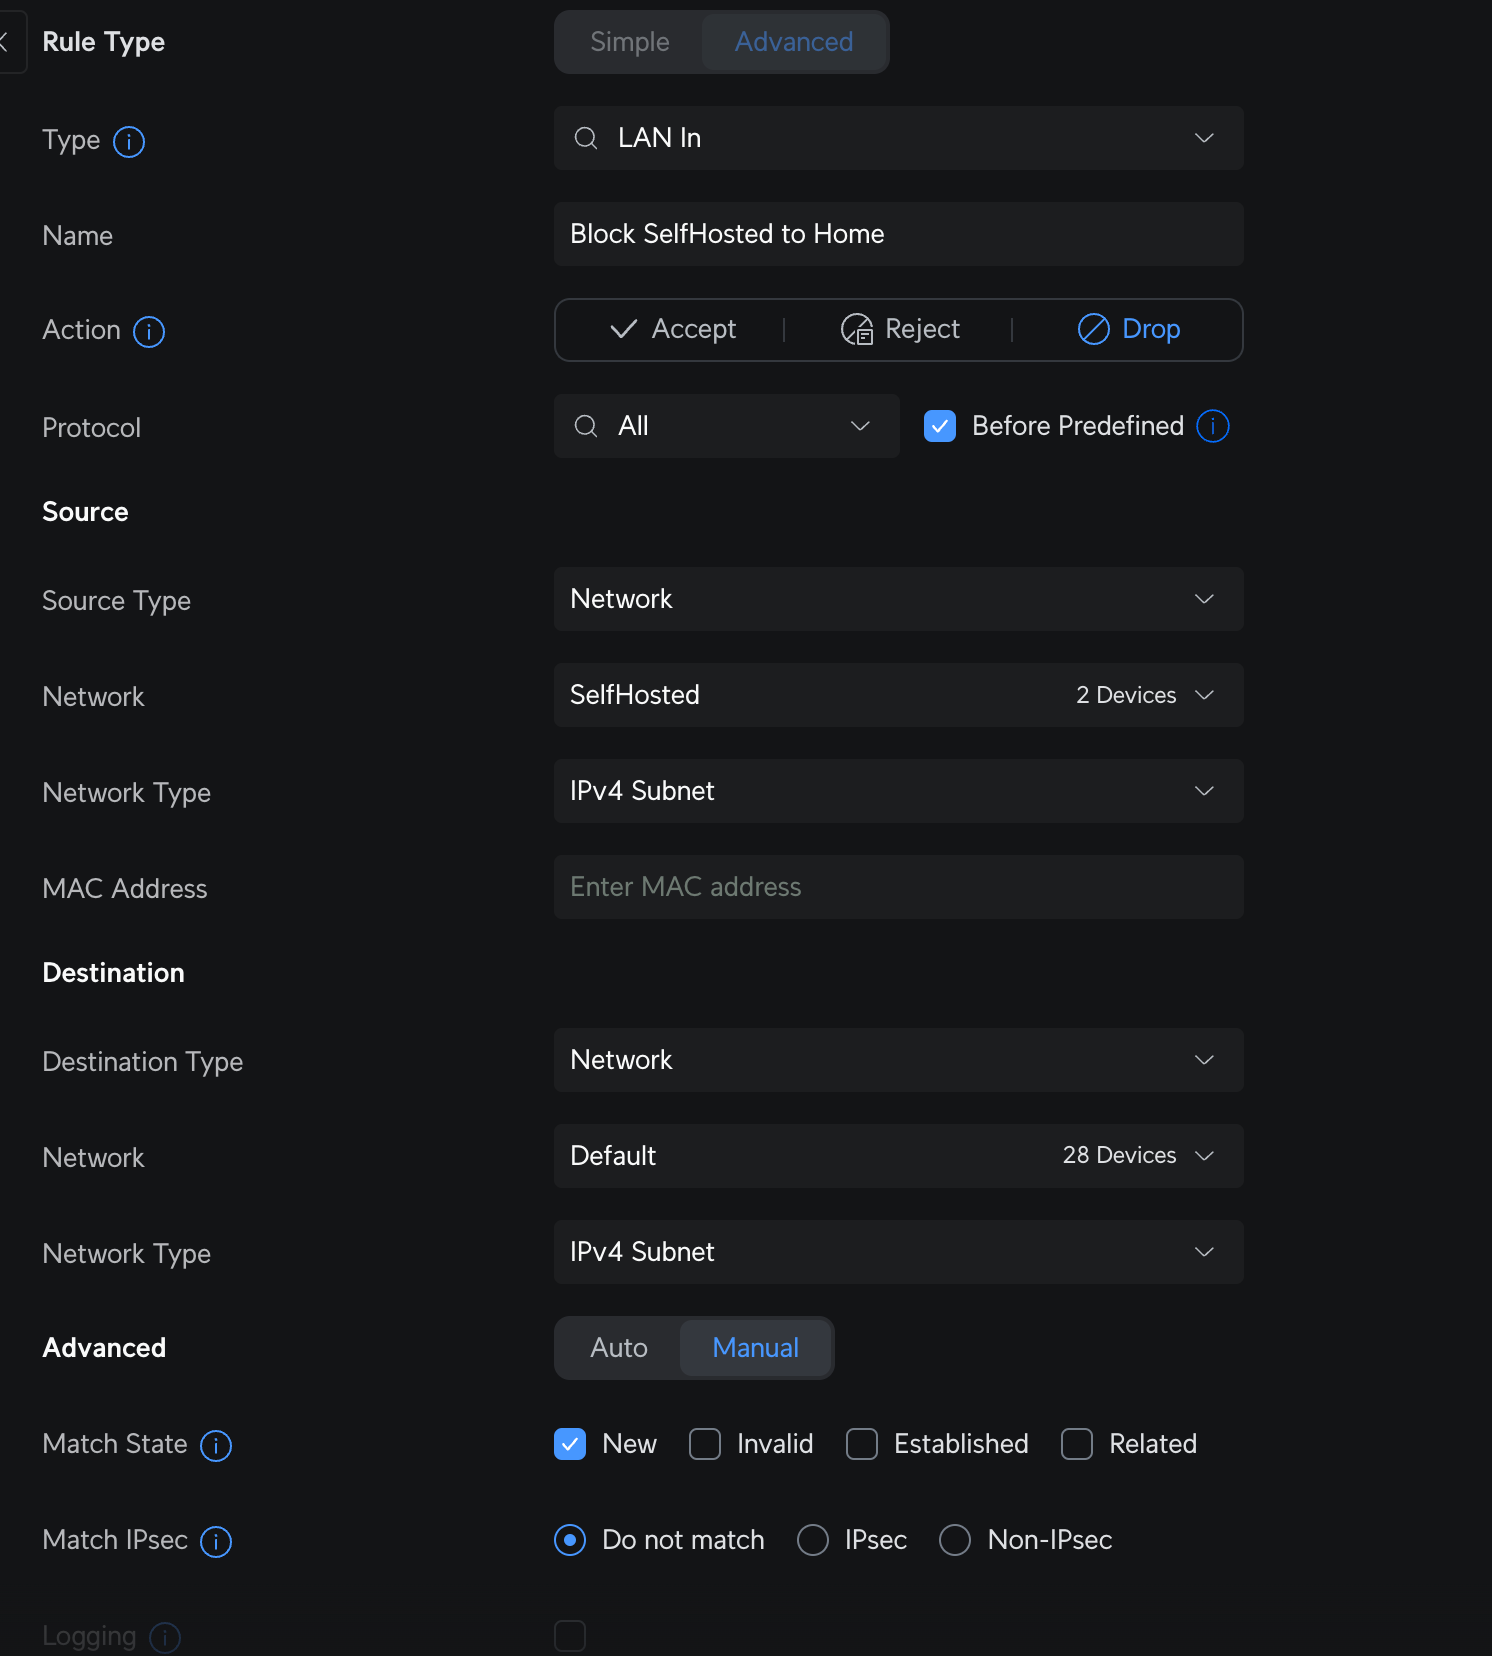
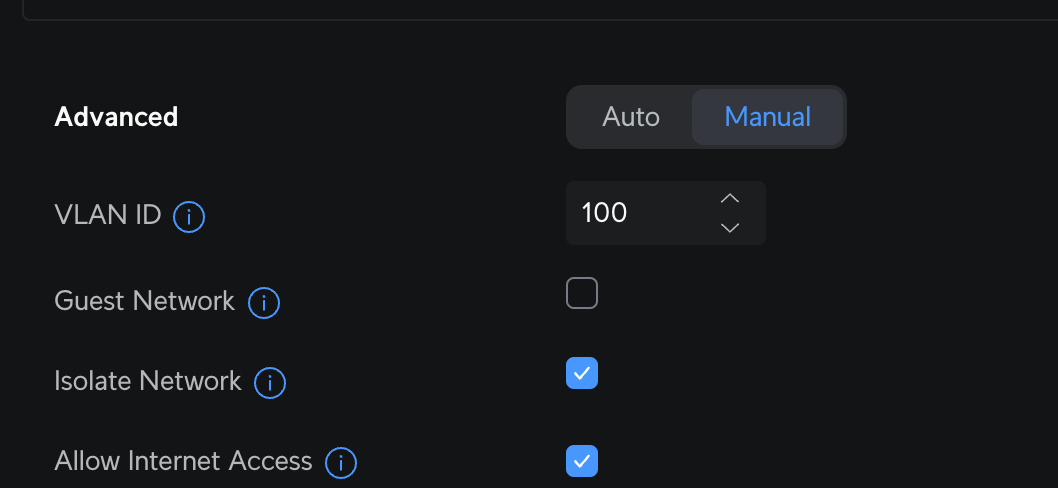
Along with this setup, I also created a new VLAN (100) for the publicly hosted apps (like this website) that in which that is completely isolated from all other networks. That's where we used the Isolate Network button within the Unifi console to keep things simple.
With Proxmox being VLAN aware, we can utilise VLAN tagging to tag containers and VMs within Proxmox to utilise this VLAN when setting up publicly hosted services and keep them contained.
ALL THE VLANS
Not that it was much of a concern right now, but at this time I was currently utilising a small layer 2 switch by Netgear. The problem with this was my main Unifi switch was pumping all VLANs to this switch, making them all available to the Netgear and all devices on that switch.
Reason for this at the time was there were 1 or 2 devices on that switch I require in VLAN 1. So while it wasn't a major concern, it doesn't allow for the full network isolation we wanted earlier. Spinning up a container and placing it in VLAN1 would give it full visibility into my home network and personal devices. We don't want that.
As a note, this was further changed a week later by adding a little Unifi Switch in the mix purely for this area, allowing the full isolation required.
Node Addition and Clustering
Early on, I had the intention of adding a node and clustering these for the ability to fail over containers and VMs should a failure occur (or simply upgrading hardware, software on a node which requires downtime).
So with that in mind, I thought I'd jump the gun, pick up an additional Dell micro PC, set it up now while I had this project going on and everything's fresh in mind.
A quick web search found me a Dell 3070 for around £59.99—a bargain that sold out instantly (thanks to yours truly). Again, we went through the same process. It had the same spec as the 7070 purchased earlier, so we gave it the same level of TLC and upgrades;
- 32GB RAM
- 2TB NVMe
- Re-paste of CPU and a cleanout.
Once assembled and a cluster created between the 2 Dell's, it was time to tidy up.
2nd Dell micro conflabber added and a new Synology NAS (4TB RAID 1) to make up for the storage lost from the big old box I had before.
— Dan Jones 🏴 (@dannyducko.com) 2024-11-15T08:25:53.350178Z
This will probably be the cleanest you'll see of this setup, following a repaint of the home study/ office.
HA and Maintaining a Peaceful Quorum
High-availability was something I wanted to chase. Along with fast fail-over in the event of communication failure between the 2 nodes.
Now, I did not know about Quorum and its involvement in the fail-over process. It was back to docs and internet search to find out more... Why? I initially had a couple of LXC's in the cluster group and on the primary node, but when pulling the network cable I'd notice that fail over would take some time for the containers themselves.
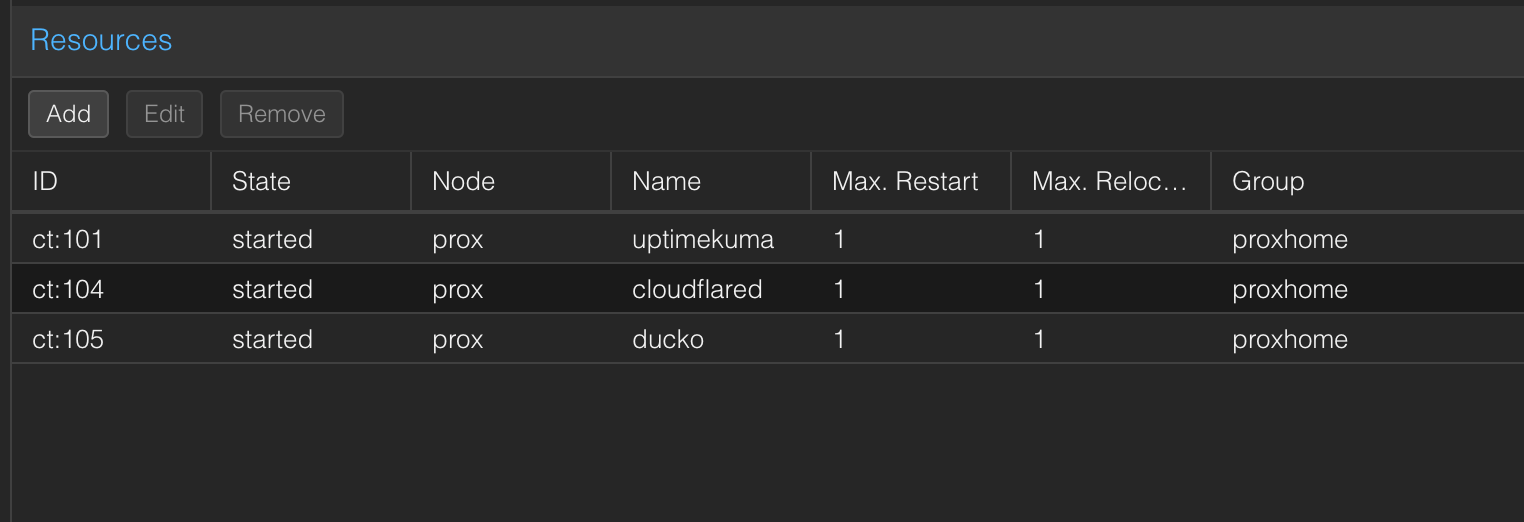
Sometimes it would take 2 minutes to fail-over, sometimes up to 5 minutes, which was fine at that moment in time, but when wanting to host services like this blog in the future, it's not great.
The Right to Vote - Quorum
After doing a bit more research into HA on Proxmox, I quickly came across Quorum and the entire reason for its existence.
- Preventing split brain
- In a split brain scenario, nodes lose communication with each other but remain operational. Each node believes it is the primary node and continues to make independent changes to shared resources (e.g., VMs, storage), leading to data corruption or inconsistencies.
- Ensuring cluster consistency
- Proxmox clusters share critical configuration and state data between nodes (e.g., VM definitions, HA status). If nodes act independently without quorum, this data can diverge.
- Reliable fail over
- If quorum is lost, Proxmox cannot safely determine which node should take over HA resources, leading to delays, manual intervention, or failed fail over.
- Avoiding unsafe operations
- Operations like starting VMs, migrating workloads, or changing configurations could be executed simultaneously on multiple nodes, creating conflicts or data loss.
- Enabling Proper Recovery After Failures
- If a failure occurs, nodes may disagree about which resources were running where, complicating recovery.
All sound great! Right?
Currently, the Proxmox cluster's two nodes equally share voting power. Not so good. If 1 node were to go down, the other node still only has a 50% share, meaning it doesn't really know what to do. This causes slow fail-over's, split brain type scenarios and problems with cluster restoration following a node coming back into action.
An easy but expensive solution to this would be to add a third node, another Dell micro PC, but it isn't something I want to entertain as it's too much for what I require out of it.
This is where I came across the concept of having a Qdevice. A Qdevice (Quorum Device) is a daemon that supports external voting support. Meaning, that by installing this on a spare Raspberry Pi I had lying around, it solves the issue surrounding potential split brain scenarios.
The guide below provides an excellent overview of how to install this, and I followed it during my setup.
The Corosync Quorum Device (QDevice) is a daemon which runs on each cluster node. It provides a configured number of votes to the cluster’s quorum subsystem, based on an externally running third-party arbitrator’s decision. Its primary use is to allow a cluster to sustain more node failures than standard quorum rules allow. This can be done safely as the external device can see all nodes and thus choose only one set of nodes to give its vote. This will only be done if said set of nodes can have quorum (again) after receiving the third-party vote.
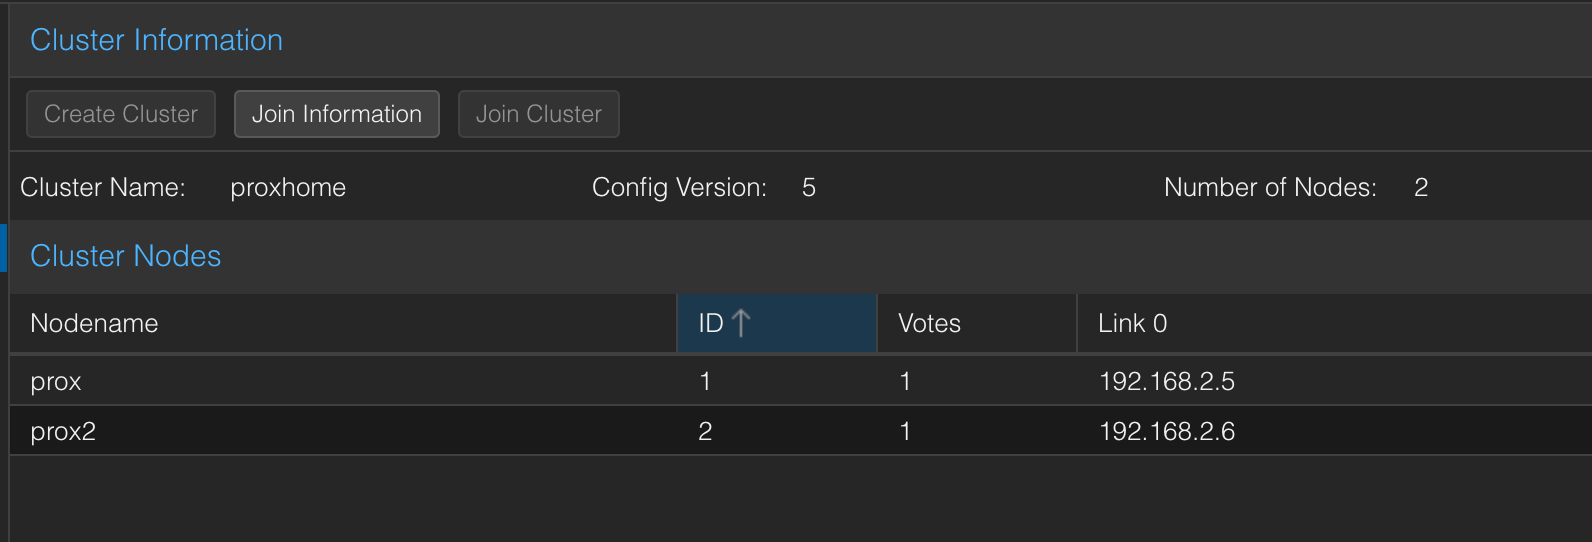
root@prox:~# pvecm status
Cluster information
-------------------
Name:             proxhome
Config Version:   5
Transport:        knet
Secure auth:      on

Quorum information
------------------
Date:             Wed Dec  4 19:05:07 2024
Quorum provider:  corosync_votequorum
Nodes:            2
Node ID:          0x00000001
Ring ID:          1.192
Quorate:          Yes

Votequorum information
----------------------
Expected votes:   3
Highest expected: 3
Total votes:      3
Quorum:           2
Flags:            Quorate Qdevice

Membership information
----------------------
    Nodeid      Votes    Qdevice Name
0x00000001          1    A,V,NMW 192.168.2.5 (local)
0x00000002          1    A,V,NMW 192.168.2.6
0x00000000          1            Qdevice
As you can see, the Qdevice is now an external voter in the Quorum process, removing the requirement for a third node. With each node now having a 33% vote share, if one node were to fail, the other node and the external voter (Qdevice) could negotiate between themselves and the secondary node will take the workload and migrate any VM's and containers, so as long as they're on a shared filesystem. I place any HA-requiring containers on the NAS's NFS share.
Replication and ZFS
Now that we had Clustering, HA, a shared file system for containers in HA and Quorum set up, there was still a minor issue to resolve. I was still experiencing a slow rebuild of the containers on the secondary node. Again, this isn't really a major issue, but a problem I wanted to dig into further for my sanity.
After going through a bunch of articles, Proxmox documentation, it seemed the ideal way to do this would be to utilise a second drive in both nodes and create a ZFS Pool, allowing regular replication of containers and VMs regularly. This would leave these container disks in a hot standby state, allowing Proxmox to restore services quickly.
Adding some additional storage to both Proxmox Nodes to support ZFS (replication for HA)
— Dan Jones 🏴 (@dannyducko.com) 2024-11-19T10:26:57.154848Z
Can't ever have enough storage
Tunnels for all
Whether I should include this section was uncertain. It may not be crucial to the Proxmox setup, yet it could benefit those venturing into self-hosting public sites and services. With that in mind, let's just get on with it.
CloudFlare Tunnels
This site you're on right now is powered by the Proxmox cluster setup as described in this article. To avoid any unnecessary and complicated networking setup, I simply created a new VLAN which hosts public facing services. This network remains completely isolated from all other internal networks, while still allowing limited internet access.
The only allowed destination addresses for containers in this network are;
- CloudFlare IP address ranges.
- Debian update repositories (port 443).
- GitHub (port 443).
- Google DNS (port 53).
This is to limit any negative consequences to a compromised container.
A Cloudflare tunnel routes all containers with incoming traffic (HTTPS, etc.) on this network to an LXC hosting Cloudflared. That container can then only output https traffic to the container hosting this blog and in return, the container hosting this blog can only receive https traffic from the container hosting Cloudflared.
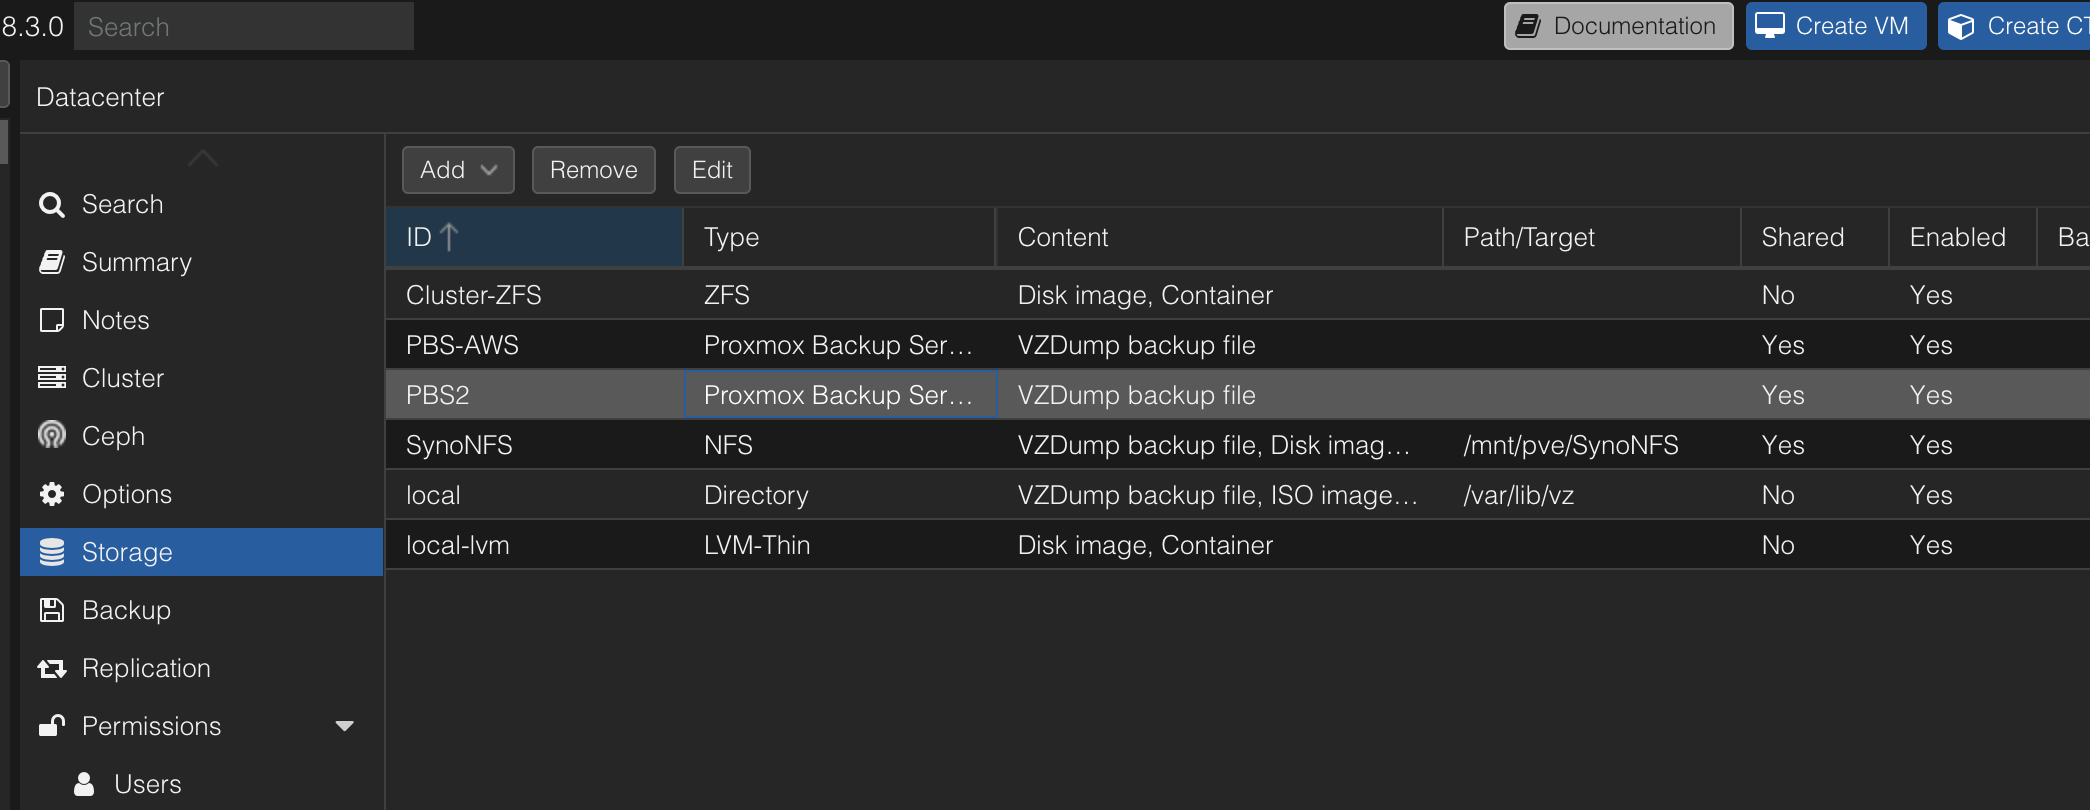
Backups
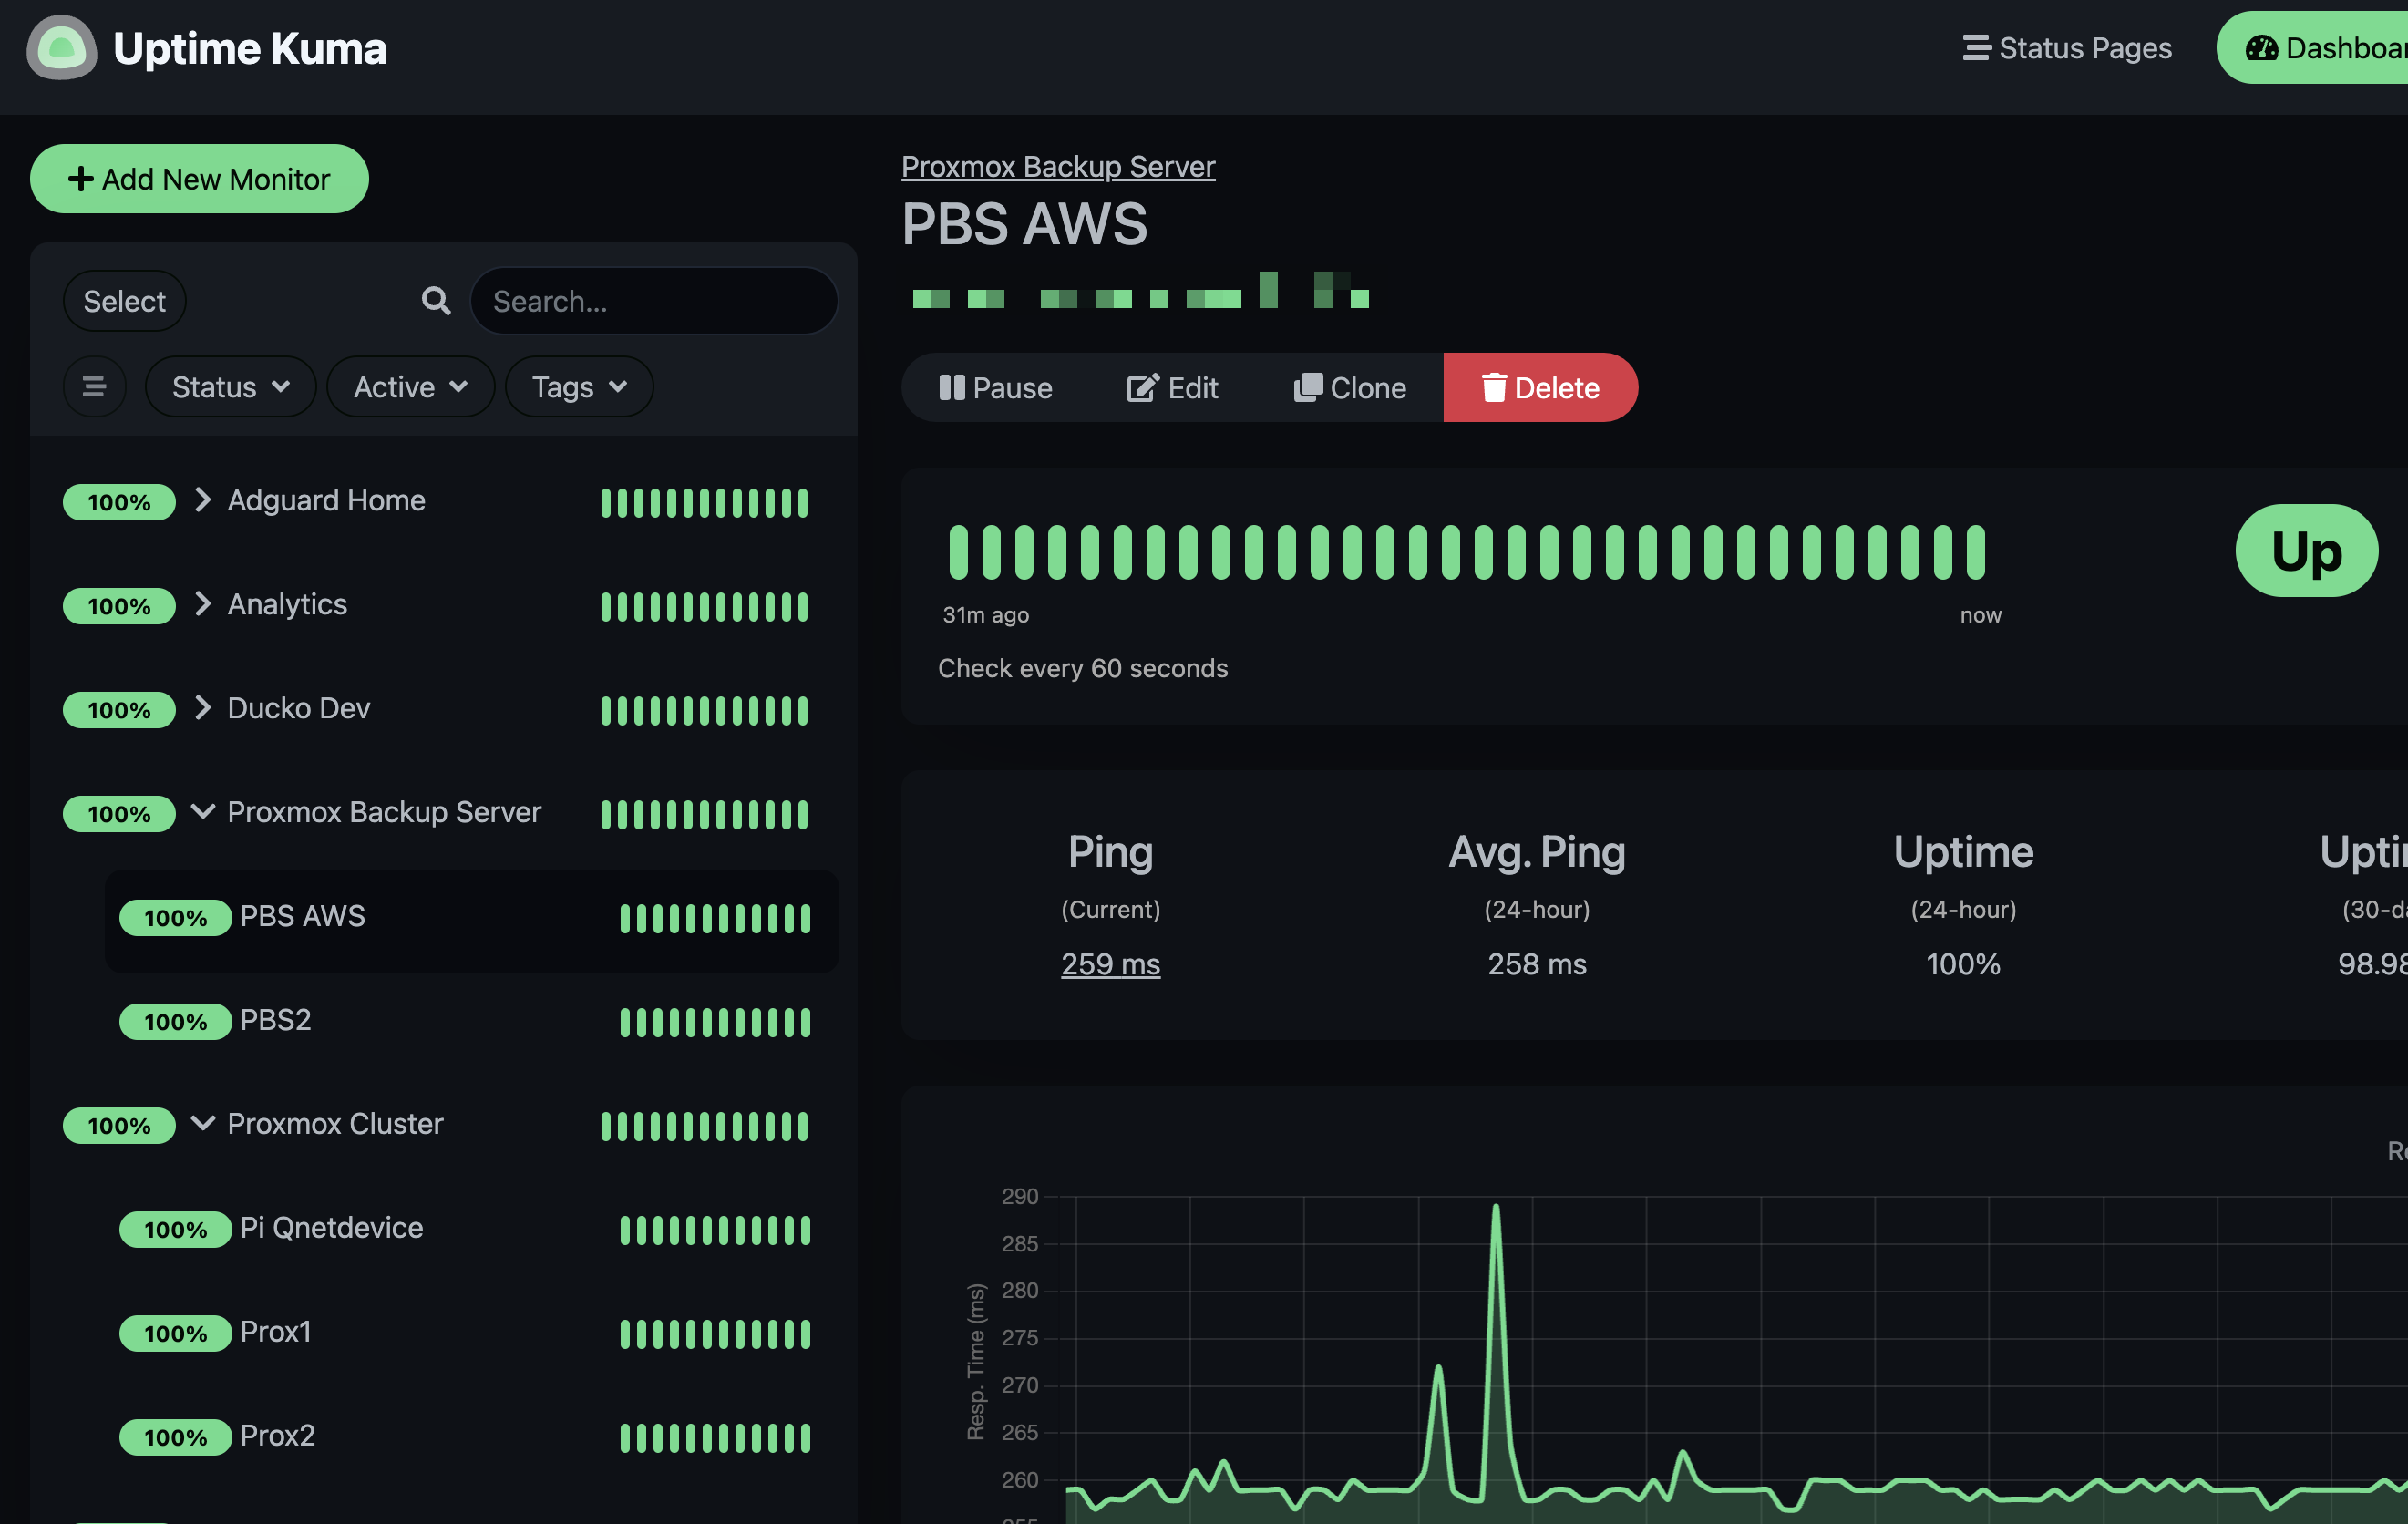
Proxmox makes backing up your containers and VM easy. With Proxmox Backup Server, it's as simple as finding a host to install it on, get it running, add the storage location in Proxmox and configure your backups.
In my case, as you can see below, I have 2 Proxmox backup servers. Originally, backups were being written directly tot he NFS storage on my NAS, but the way Proxmox Backup Server handles incremental backups/ deduplication and more, it made sense to utilise PBS.
More information on deduplication in Proxmox Backup Server
I have 2 PBS servers. One as an LXC container on my secondary Proxmox node and one in AWS on Lightsail. The one in AWS is essentially my offsite storage, in case anything were to happen with my storage and nodes at home. The reason for choosing AWS is simply down to myself having unused credits in my AWS account, so it makes sense for now to utilise them until I need to move elsewhere.
Setup in AWS is simple enough. Set up a Debian instance in Lightsail, configure the security groups to only allow https and 8007 from my home IP address and it's locked down. Every evening, backups are made of all containers every 24 hours, and Proxmox Node configuration backups every week, which we'll go more into in a separate post.
The Proxmox Backup Server on a container in Proxmox takes backups of each container, except itself, every 6 hours. We back up the PBS container itself to an NFS share on the NAS every 12 hours, outside of the 6-hour backup schedule. So my backups are.... backed up?!.
With this setup, should anything happen, remotely in AWS or locally at home, I have full backups of;
- Containers and VMs which can be restored and rebuilt at any time.
- Proxmox Node configuration files to allow a complete rebuild of a node in case of failure.
I'm going to be breaking out the full backup process, including setup into a separate post as this one is now getting long. Stay tuned for more around this.
Monitoring & Alerting
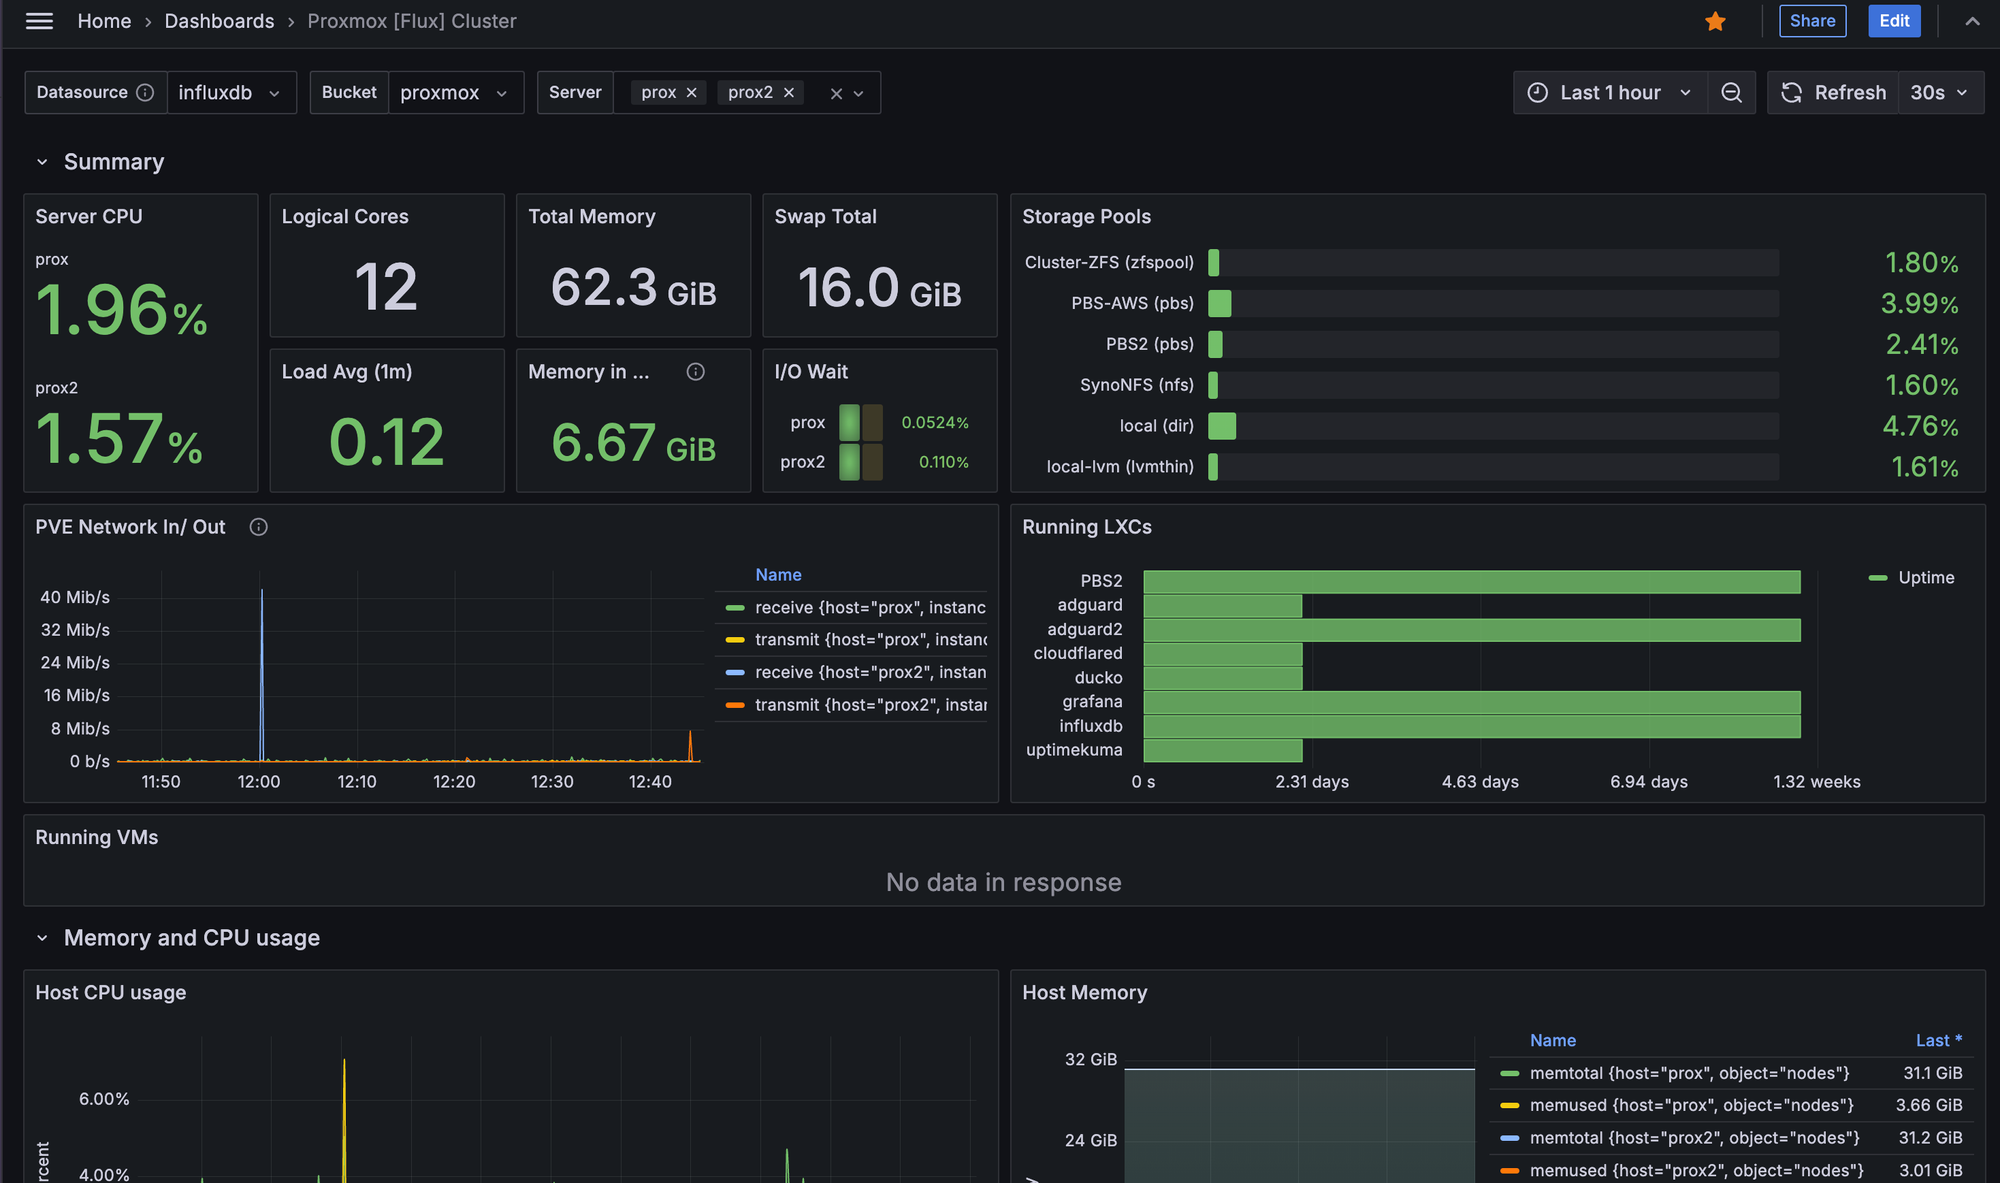
Monitoring and alerting is something I need to take a bit more seriously. As it stands, the only alerting I have set up is if a frontend of a service goes down or a ping test fails, Uptime Kuma detects it and pushes a notification to my devices via PushOver. It works well enough for now, but I require a bit more granular information.
This is where Grafana comes into play, along with InfluxDB. Having used Grafana previously, it made sense to utilise this for metrics and dashboards. InfluxDB is a Time Series DB, and it's installed on a container within Proxmox. InfluxDB is being fed information constantly by Proxmox, such as;
- Node CPU, Mem, Disk, Network utilisation.
- LXC CPU, Mem Disk and Network utilisation.
From there, Grafana queries information in InfluxDB and presents dashboards with the information, such as the image below. This gives a better low-level view of what's going on when and where, with a 30 day view of the data.
Grafana also supports alerting/ notifications too, which I've yet to delve into deeper. Let's say the CPU server spikes and holds for over 5 minutes, which would be unusual behaviour. I could receive an alert via Pushover again to notify me of this and investigate ASAP.
I'll also be breaking the full monitoring and alerting setup guide soon once I have the notification setup implemented, but for now, I just wanted to summarise what is achievable and what available metrics can be pulled from your Proxmox setup.
Looking to the Future
After covering the vast majority of my Homelab setup, I feel it's necessary to detail what I'll be looking to do in the future around this setup. I will document these in blog posts if they warrant it.
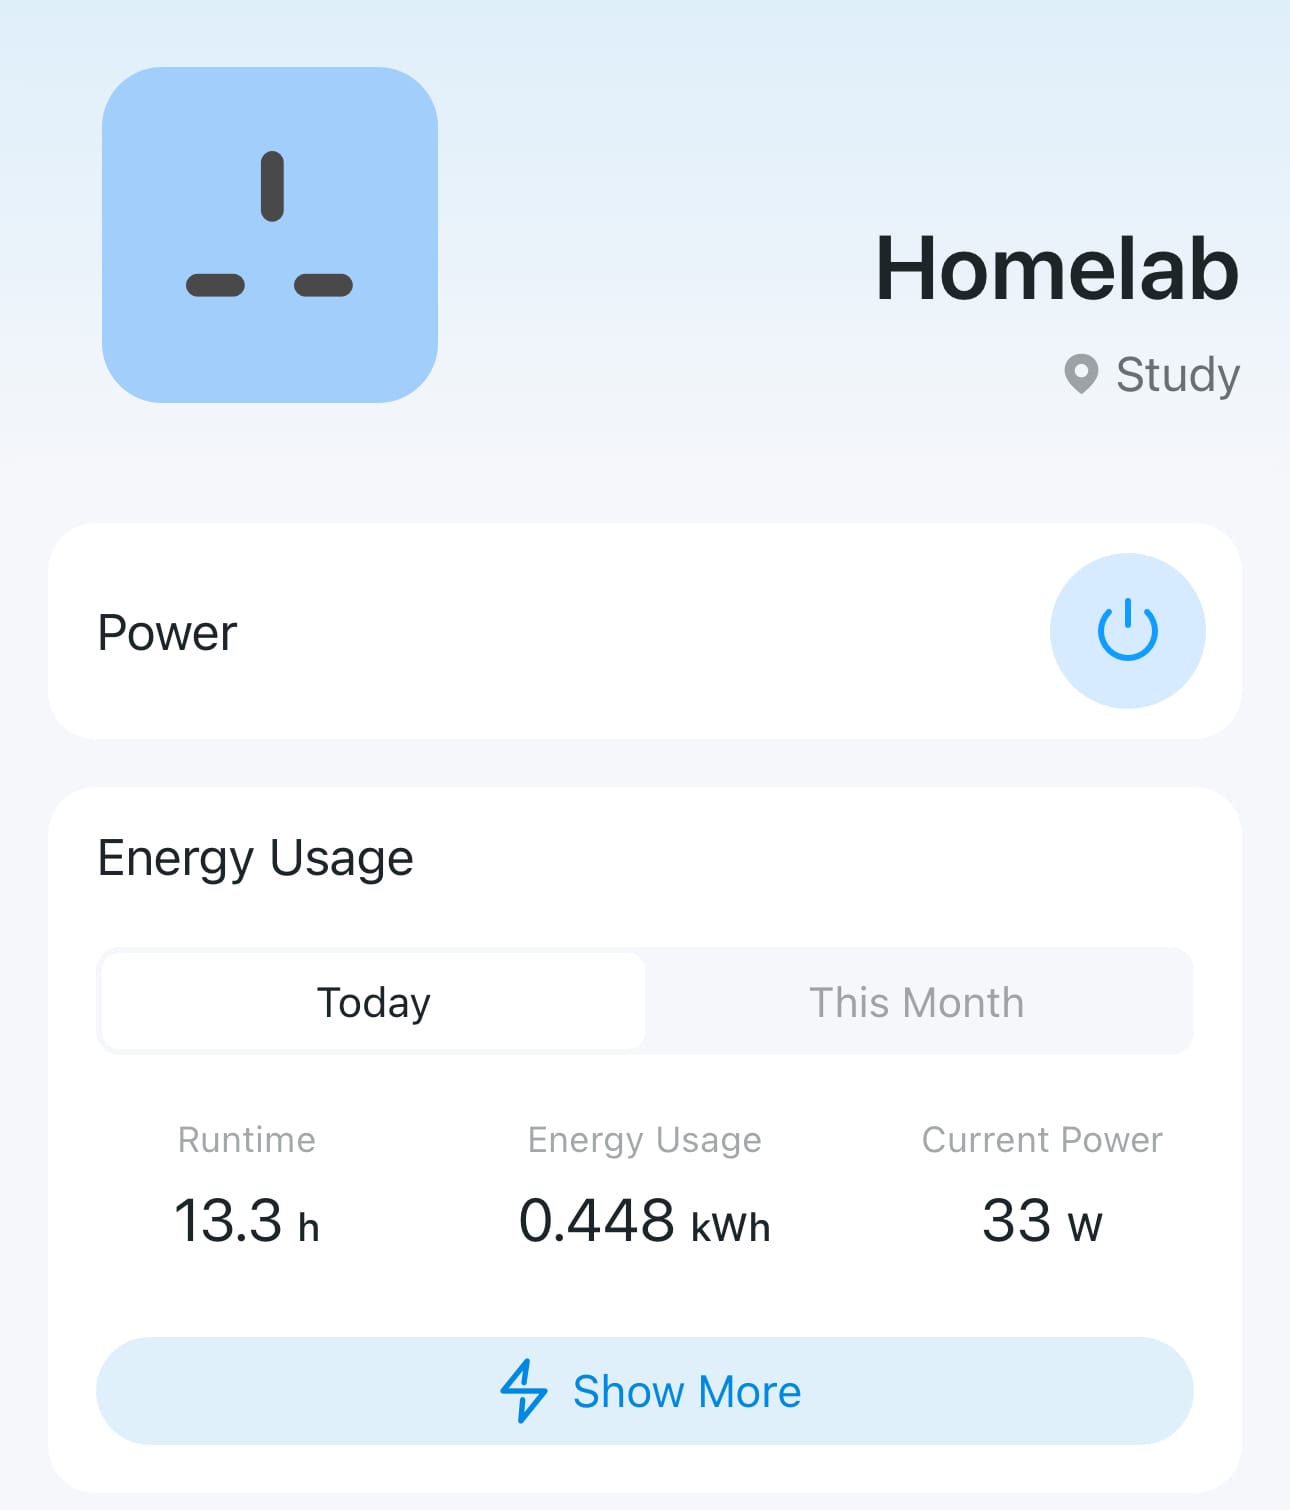
- Mini UPS
- Current setup consumes 30-35w (equating to approx. £3-5 electricity bill per month). Utilising something like this APC UPS should provide at least an hour of power, which is more than suitable for my requirements.
- Automating rebuild of nodes
- In the event of a failure, the reinstall and initial configuration of the Proxmox PVEs are manual, to an extent. Yes, host backups are being made, but I'd ideally like to use Ansible playbooks to further simplify this to save time and bring services back up ASAP.
Final (?) Setup
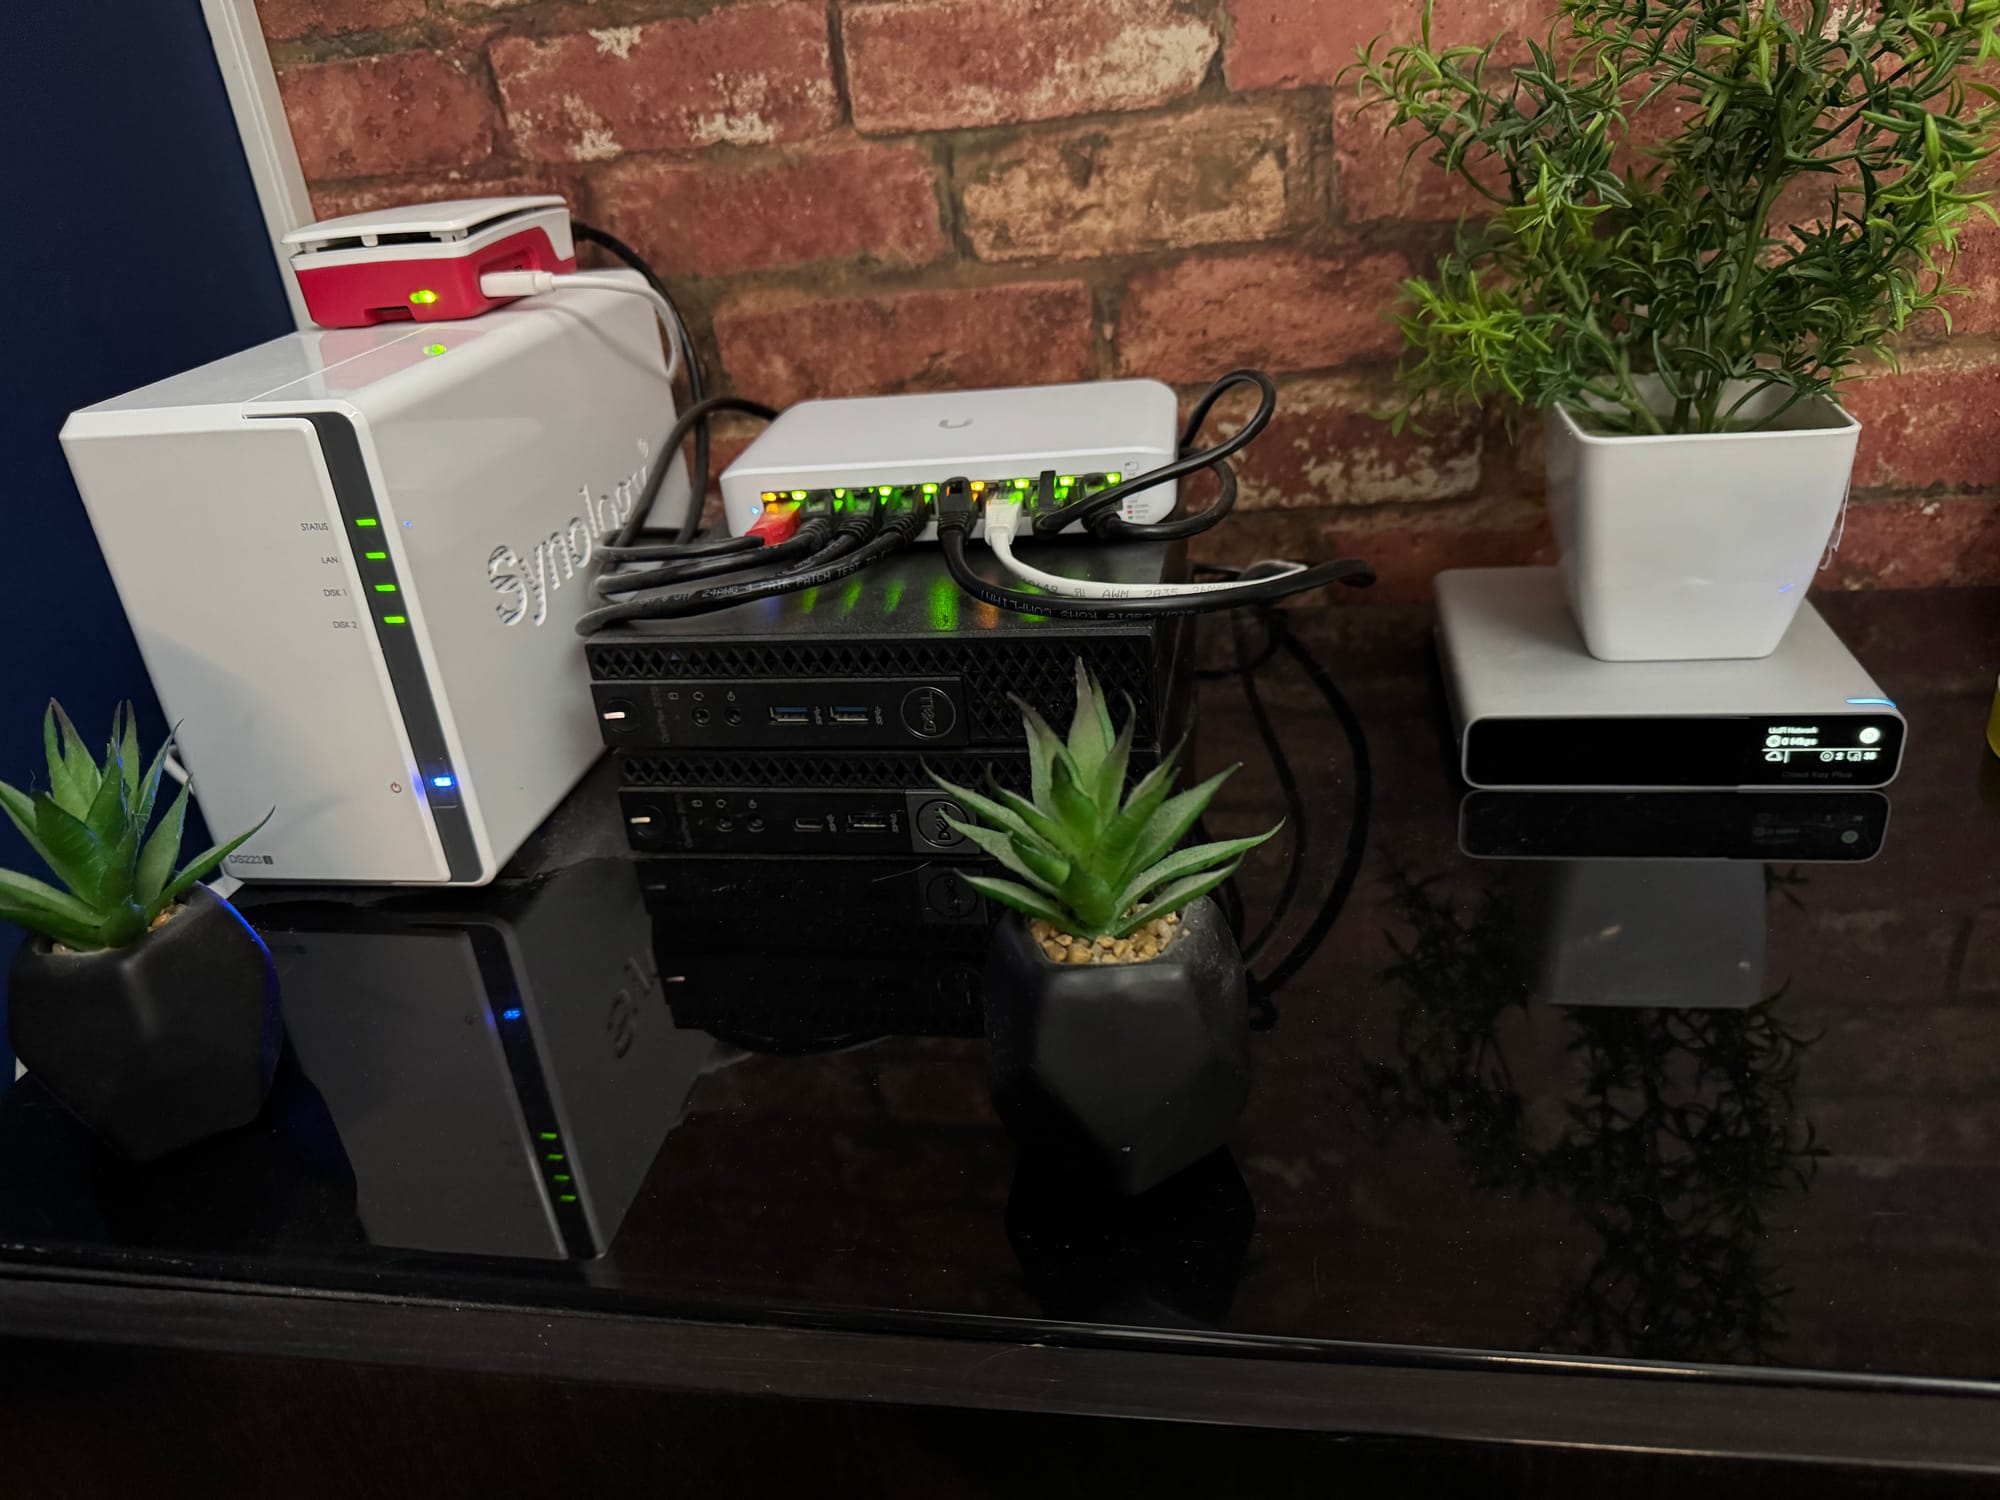
Below I just wanted to share a couple of images around the final (so he says) setup.
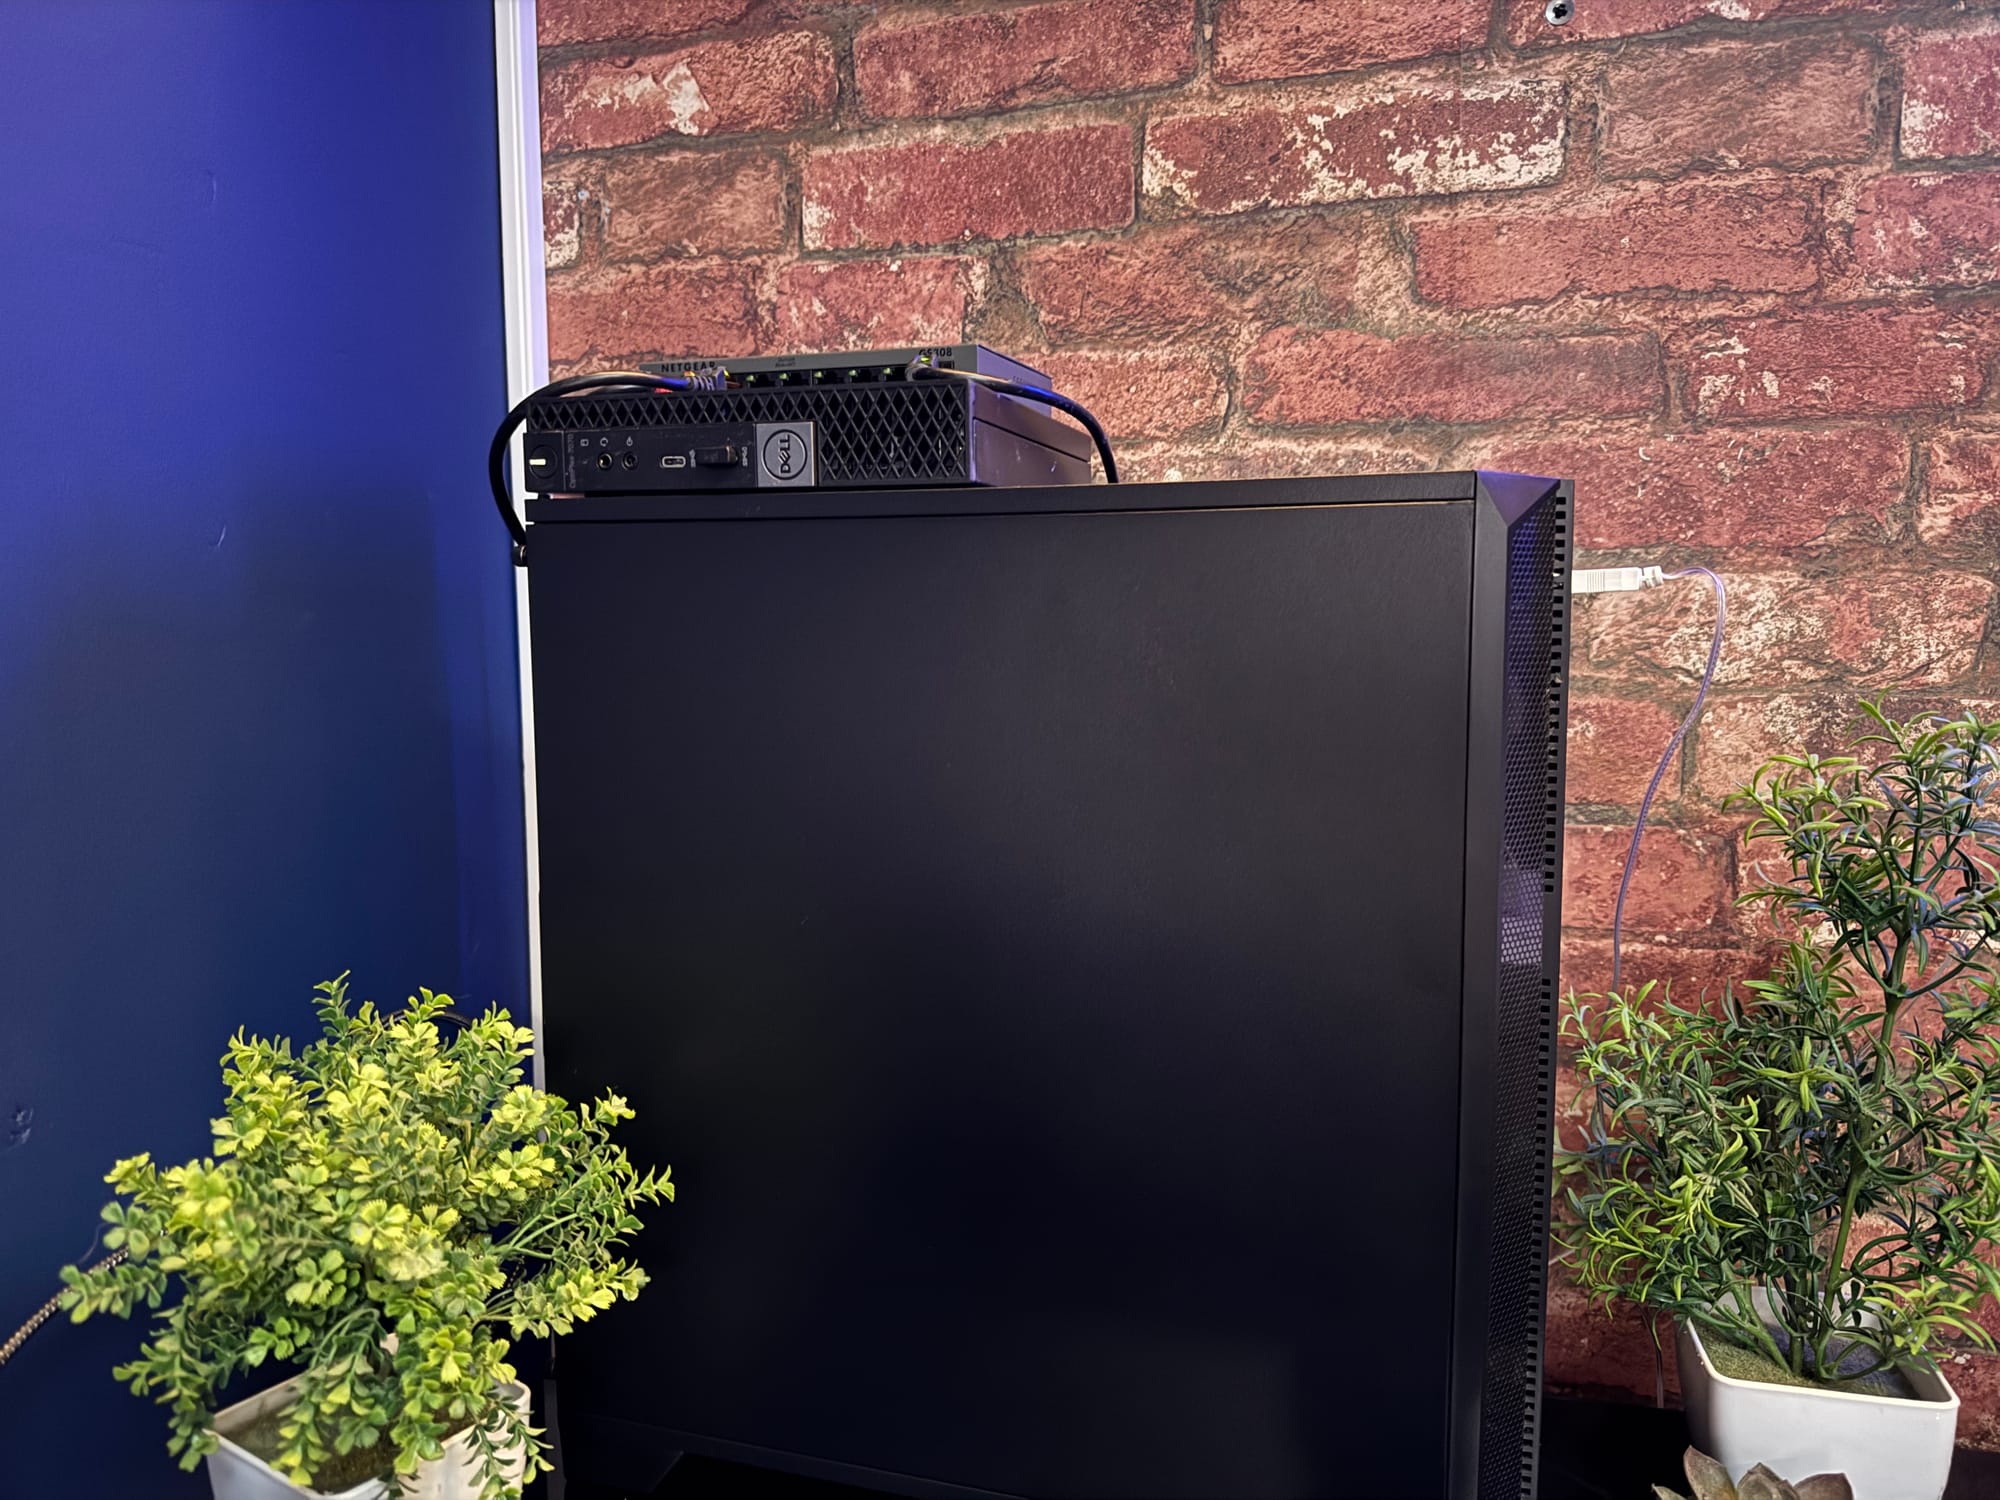
We have;
- Synology NAS with 2x 4TB drives
- Raspberry Pi as a QDevice for external voting support in Quorum.
- Unifi POE Lite 8-port switch to further isolate VLANs per port over the previous layer 2 switch, which was flooding all VLANs to all ports.
- Unifi Cloud Key Plus (Not new)
- 2 Dell Micro PC's (7070 and 3070, i5 9500T, 32GB RAM each, 2TB NVMe SSD and a 256 SDD).
- 30 ish Watts usage, totalling to approx £3-5 per month in electricity usage.