What is NetBox?
From their docs: NetBox is an infrastructure resource modelling (IRM) application designed to empower network automation. Initially conceived by the network engineering team at DigitalOcean, NetBox was developed specifically to address the needs of network and infrastructure engineers.
It essentially provides a "source of truth" for your network, all in one place, whilst allowing network automation toolsets to plug into its API.
Why install it in a Docker container?
There's a lot to NetBox. Specifically, PostgreSQL, Redis, NetBox application, Gunicorn, and HTTP server (NGINX/ Apache).
Maintaining all of these can be a bit of a pain in the a**, whereas Docker allows for easy installation and easy updating where required, as we'll detail below.
Let's get started
I'm choosing to install the NetBox container in an LXC container (with nested virtualisation) on a Proxmox server. Why? I use Proxmox for all my network lab needs (eve-ng, etc.), and NetBox will be used in my lab environment specifically.
If you choose to run the NetBox Docker container in a VM, bare metal, or Kubernetes, please skip the Proxmox steps below and go straight to [Docker Set Up](# Docker Set Up). I'm not going to go into massive detail about Proxmox. However, the below is relatively straightforward if you know how to use the basics.
Proxmox set up
- Access your Proxmox server
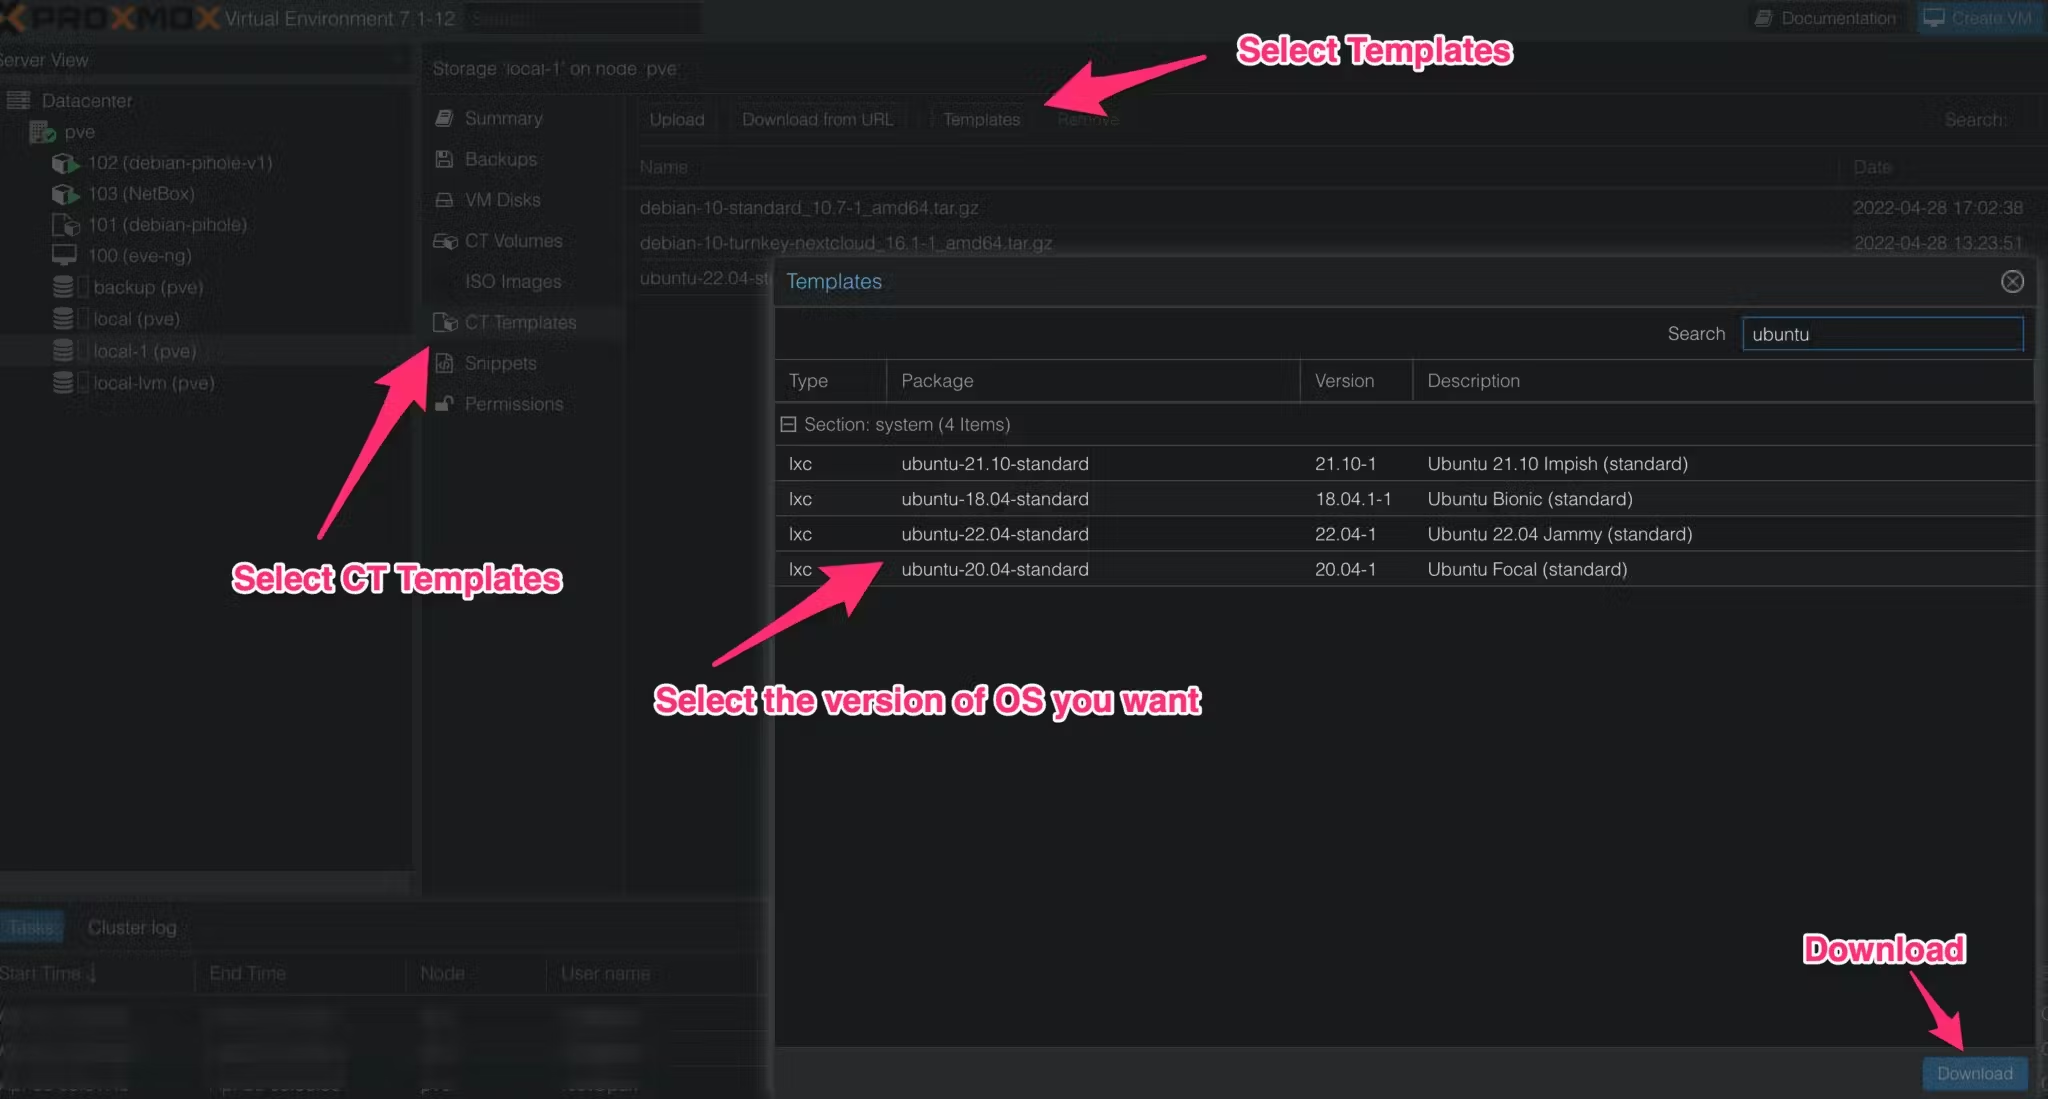
- Download a version of the Debian or Ubuntu template.
- Create an LXC container with the newly retrieved templated (or existing template)
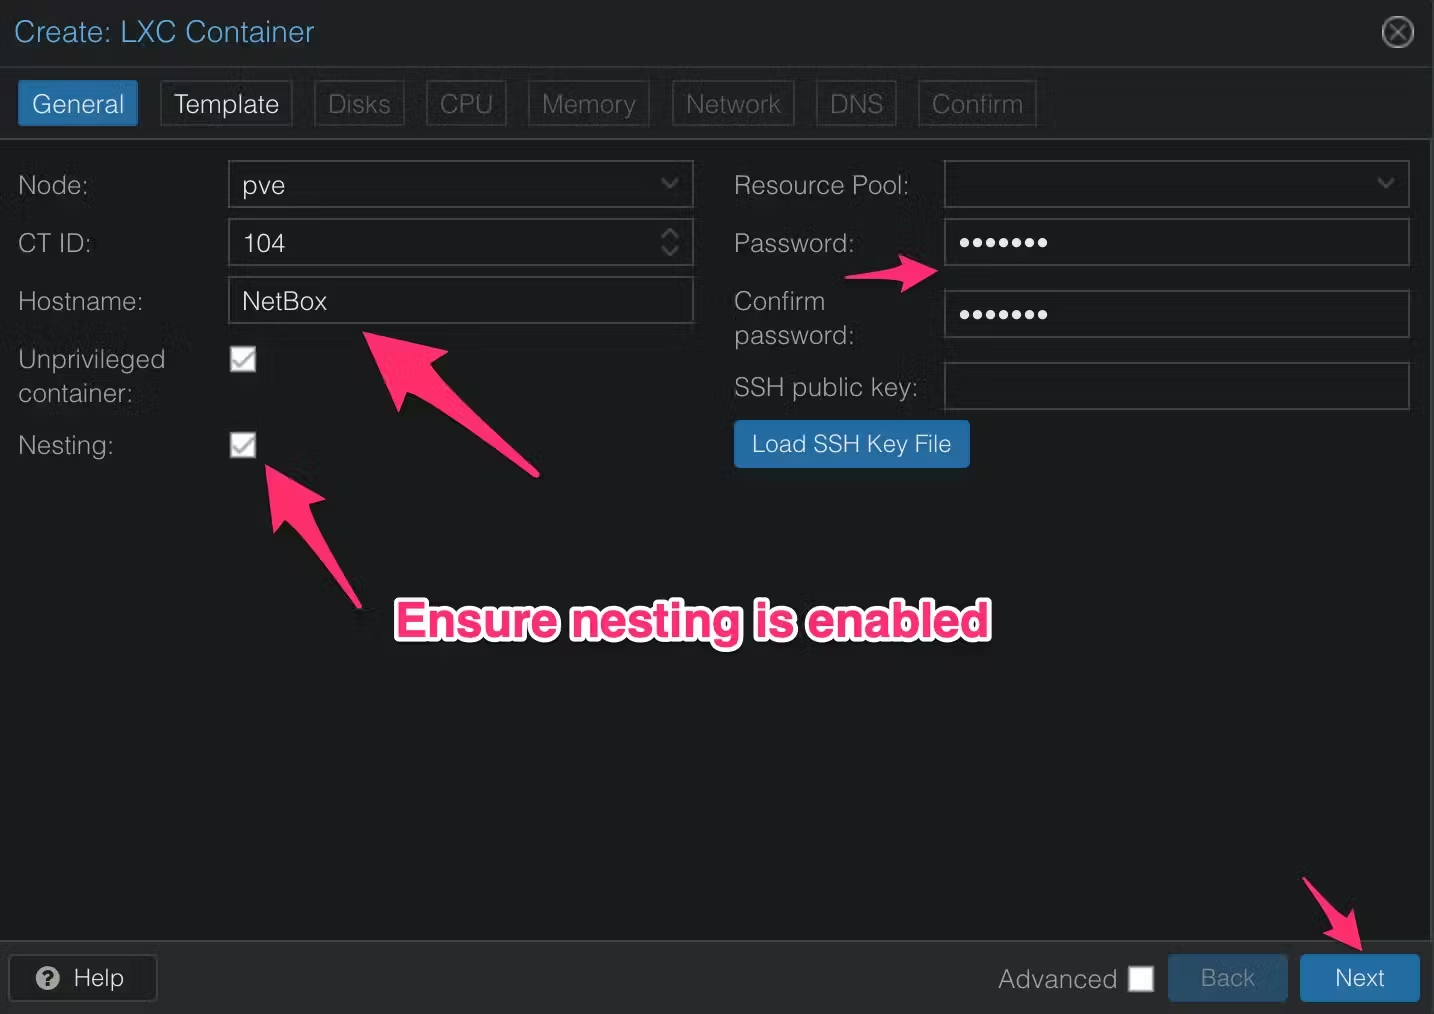
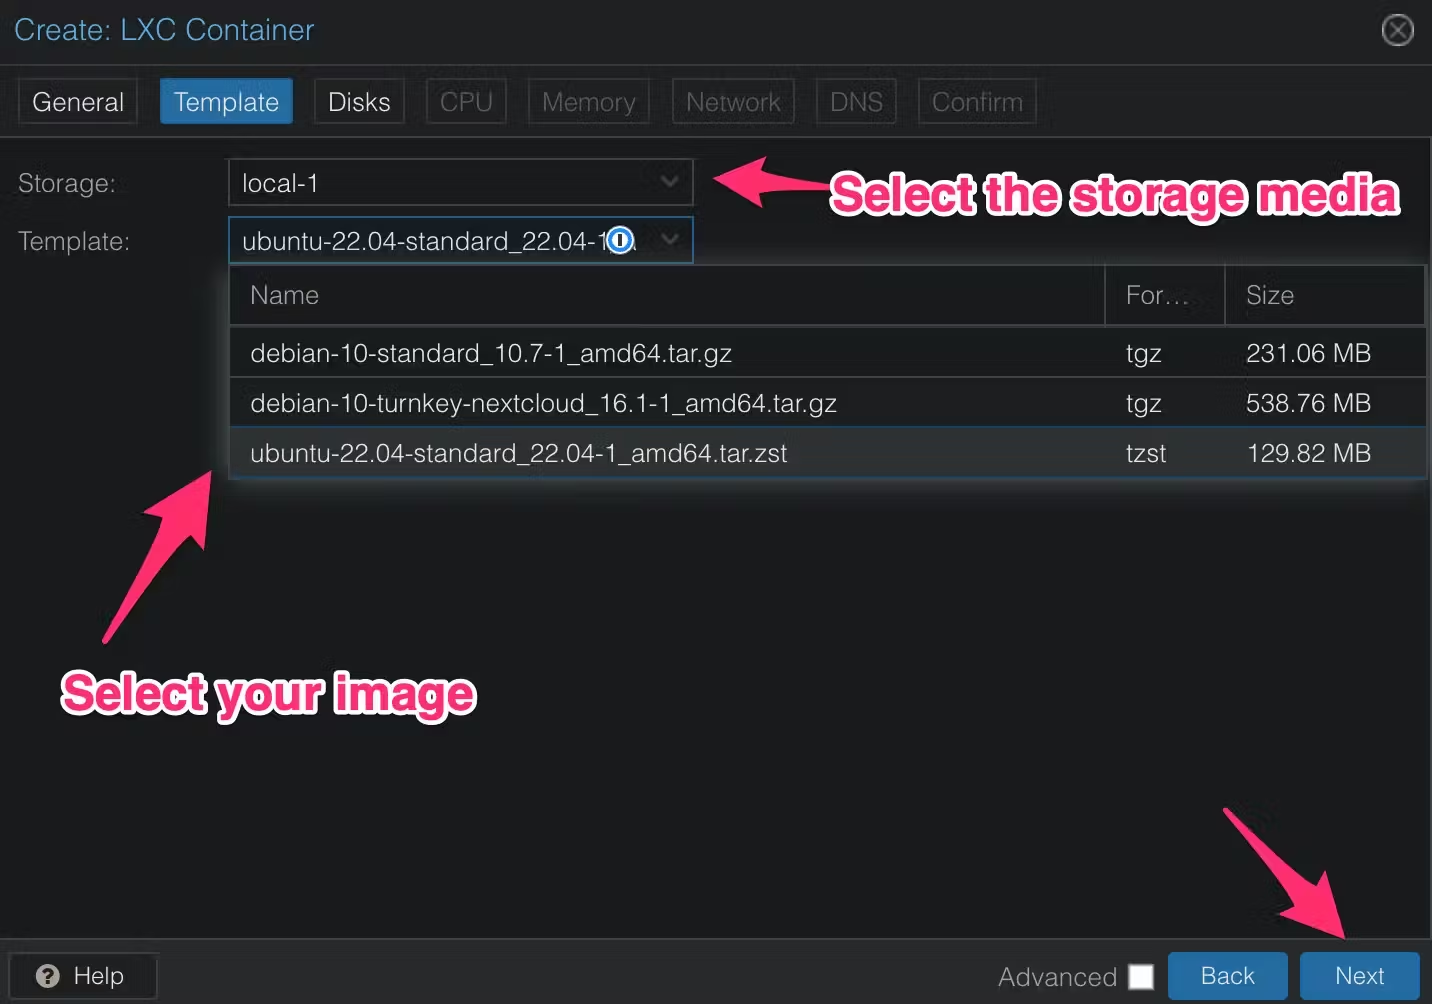
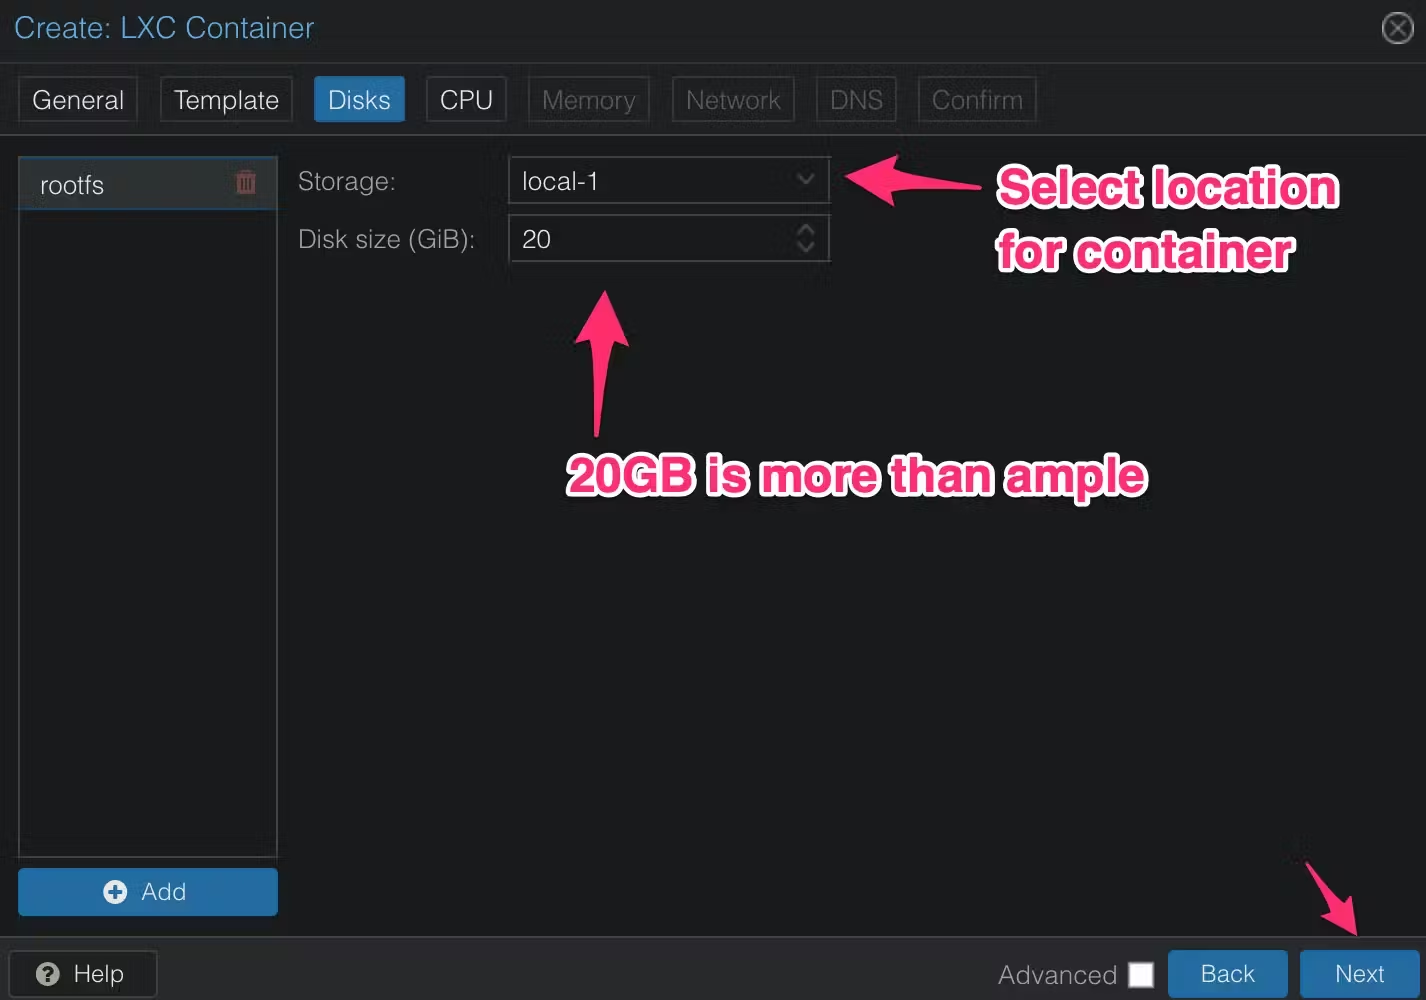
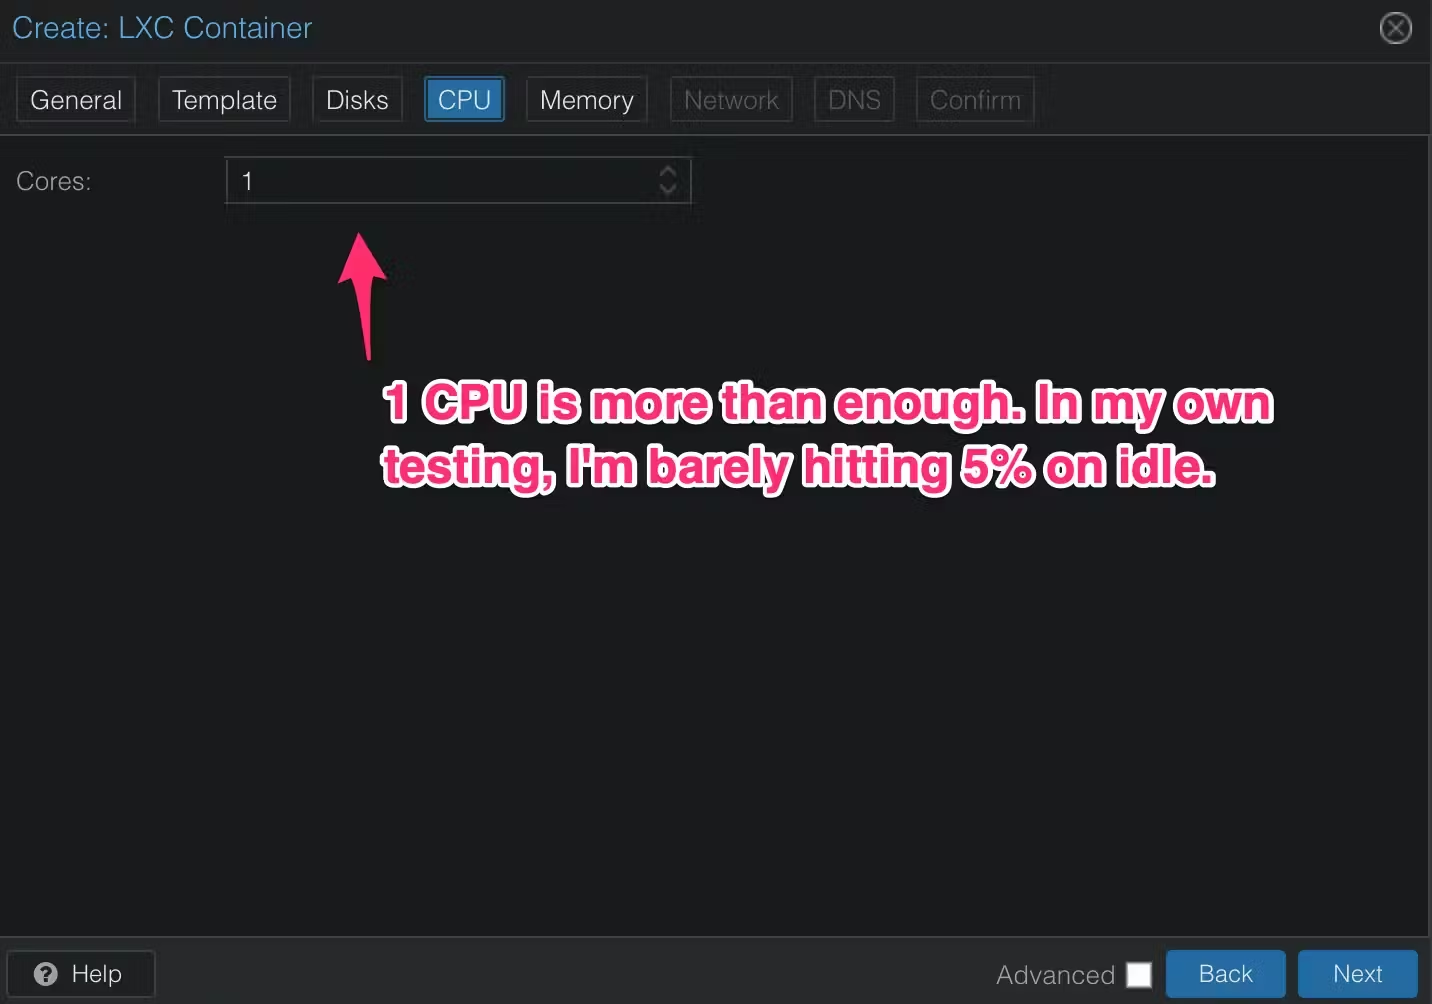

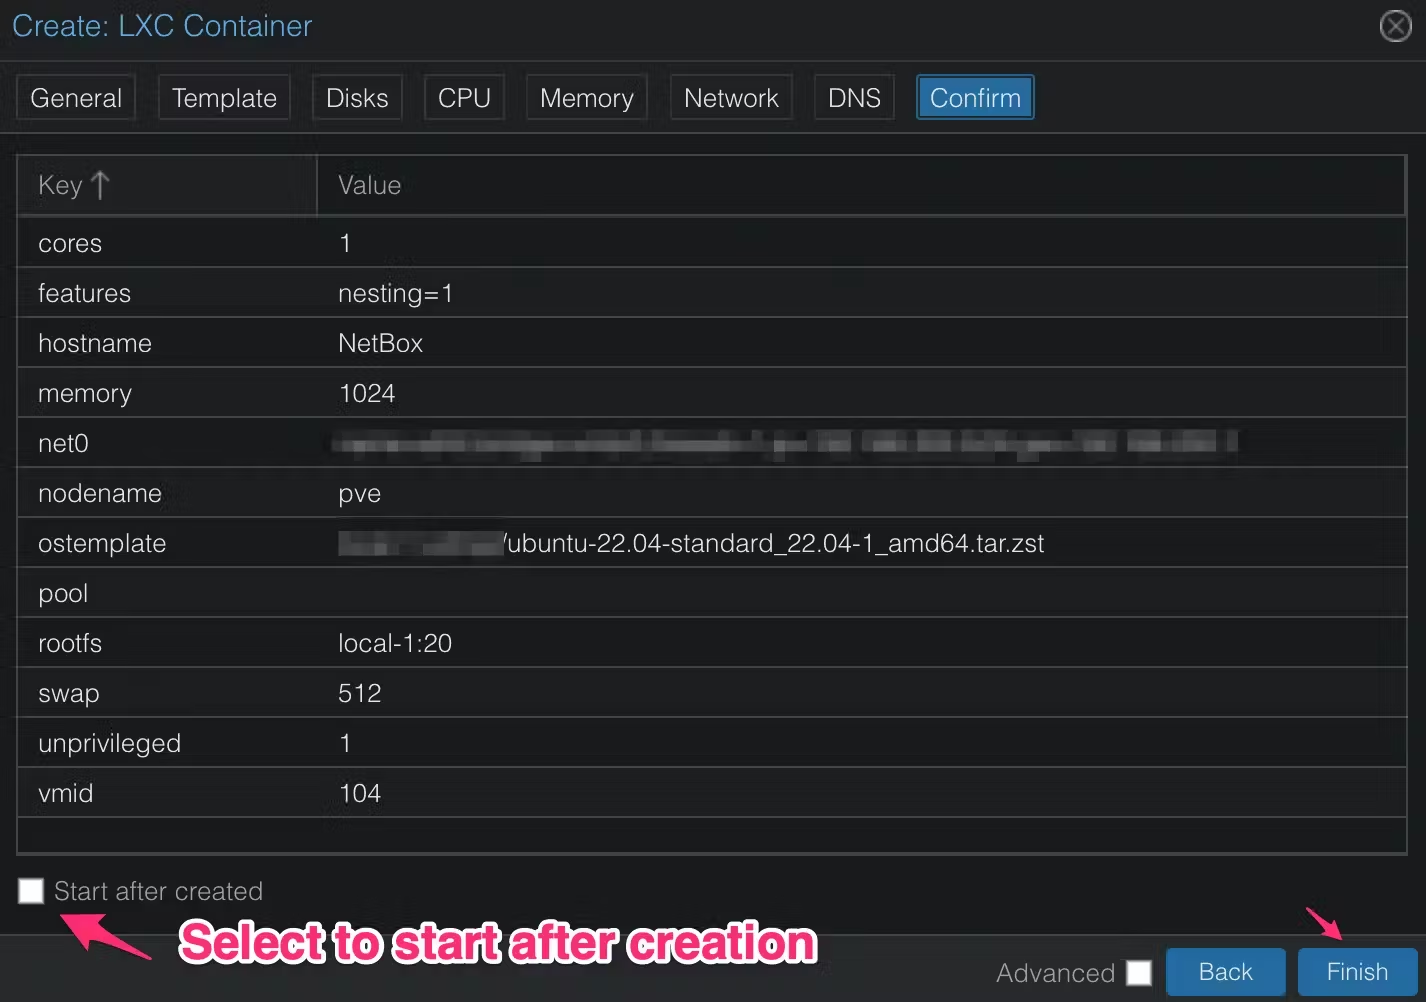
- General administration. Run the below commands to update and create a new user to SSH into the container. Change the username to whatever you wish.
Copy
apt update
apt upgrade
adduser admin
usermod -aG sudo admin
- SSH into the container with your newly created credentials.
Docker set up
Run the below commands in your VM/ LXC/ bare metal server to install the Docker essentials and accept any notices.
Copy
apt install docker
apt install docker-compose
NetBox set up
- Pull the latest NetBox Docker image from the official GitHub repo.
Copy
git clone -b release https://github.com/netbox-community/netbox-docker.git
- Issue the below commands to locate the new directory and move it into said directory.
Copy
ls
cd netbox-docker
- reissue the ls command to view all the newly pulled files.
- Copy the “docker-compose.override.yml.example” file to “docker-compose.override.yml”. The docker-compose override file allows you to override the default ports. You can check the contents of this file with the commands below. We’ll use what is already declared in the file (port 8000). You can change this to whatever you want.
Copy
cp docker-compose.override.yml.example docker-compose.override.yml
cat docker-compose.override.yml
- Pull the image(s) associated with the service defined in the “docker-compose.yml” file.
Copy
sudo docker-compose pull
- Run the docker image. There are 2 ways of doing this.
– docker-compose up
– docker-compose up -d
The -d option allows the docker container to run in the background (or detached mode). The standard “up” will lock your session with the logs from Docker.
For the first time running this, I would recommend running with just “up” to ensure no errors are generated on the first run.
Copy
sudo docker-compose up
sudo docker-compose up -d
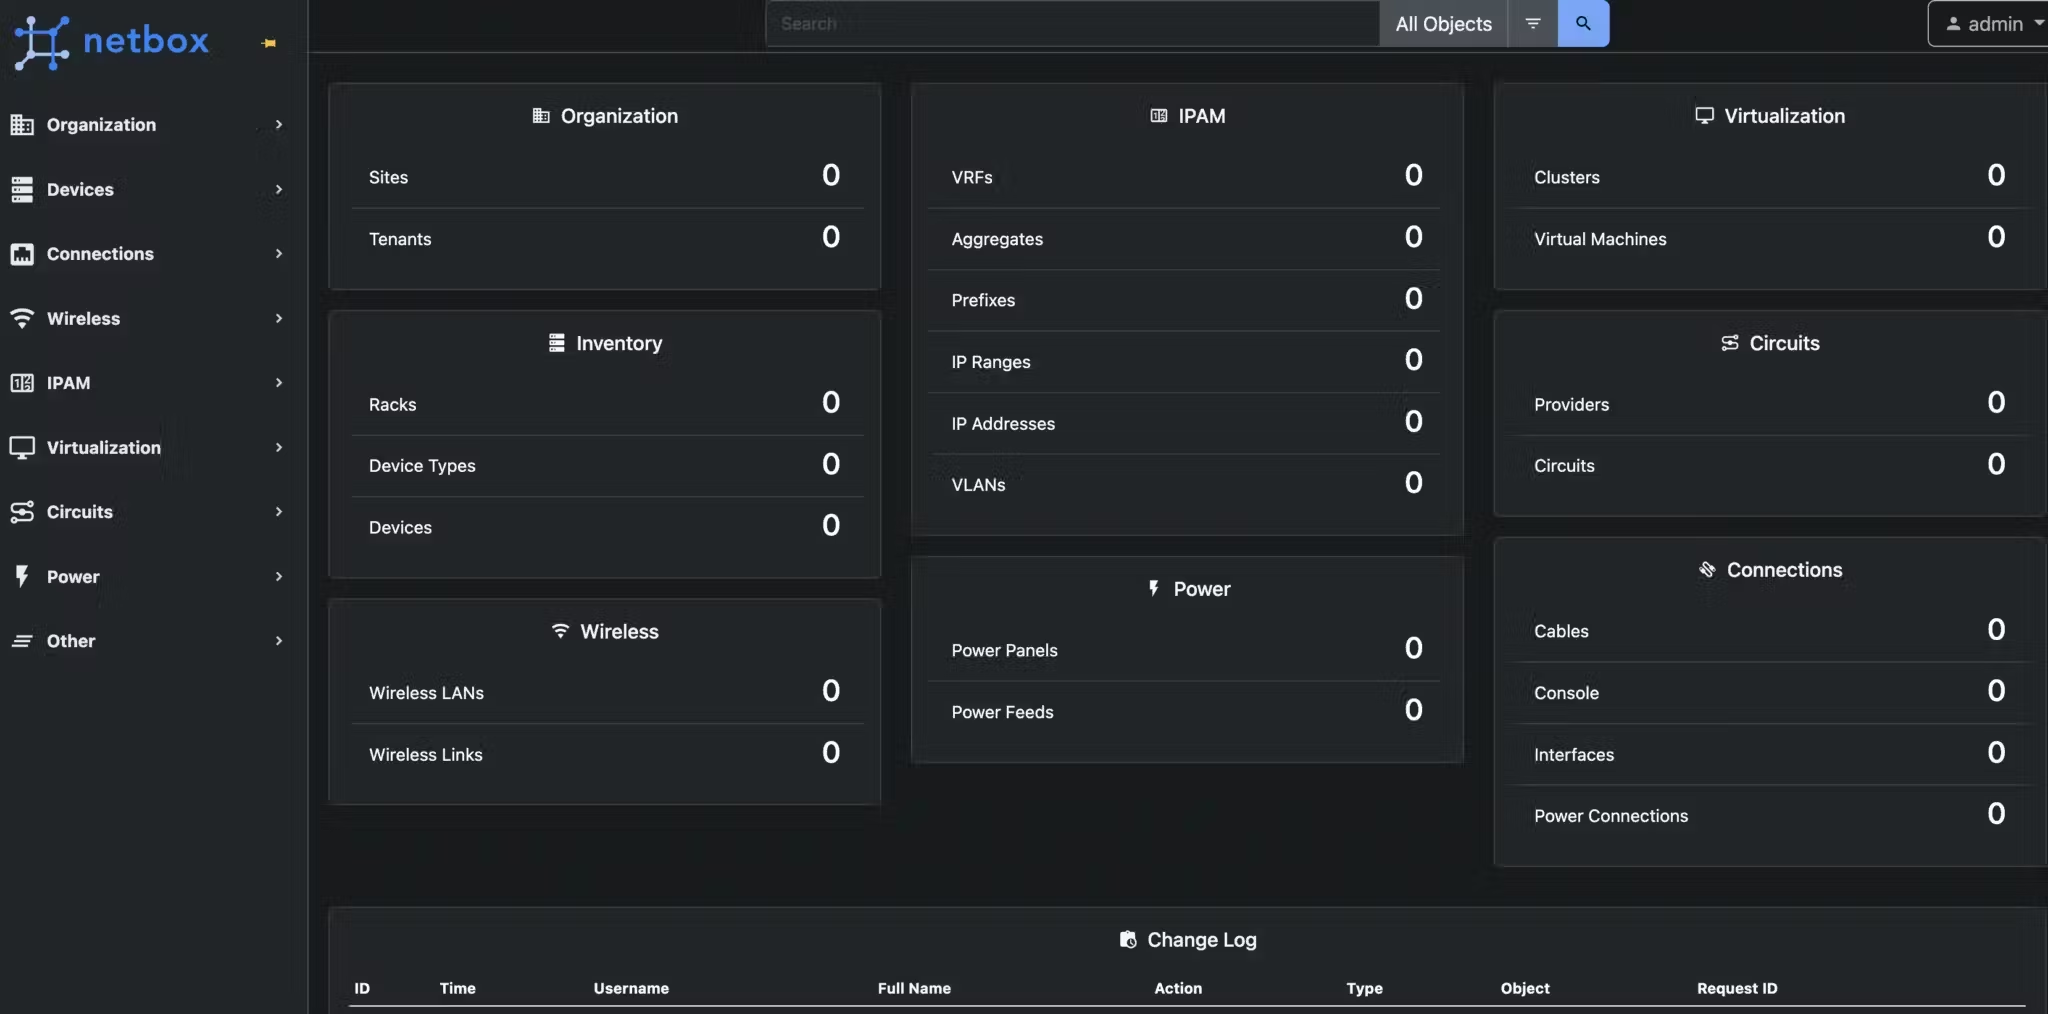
- Enjoy Netbox. Give the container a few minutes to warm up, and you should be able to now reach your newly created NetBox service on http://IPADDRESS:8000
Note: The default username and password is admin:admin.
What next?
First and foremost, you’ll probably want to dive straight into NetBox, but we won’t do that here as its capabilities are pretty vast.
Secondly, maybe you want the docker container(s) to run on restart or boot of the VM, container, etc., instead of running these commands repeatedly.
Ensure NetBox starts on boot/ restart
If you want NetBox to run on startup, follow the below:
First, stop the docker container(s).
Then, enable Docker.service on system startup.
Copy
sudo docker-compose down
sudo systemctl enable docker
Edit your docker-compose.yml file to ensure each service is set to “restart: always.”
Copy
nano docker-compose.yml
You can use my example below, which shows how to insert the statement.
Copy
version: '3.4'
services:
  netbox: &netbox
    image: netboxcommunity/netbox:${VERSION-v3.2-1.6.1}
    depends_on:
    - postgres
    - redis
    - redis-cache
    - netbox-worker
    env_file: env/netbox.env
    user: 'unit:root'
    volumes:
    - ./startup_scripts:/opt/netbox/startup_scripts:z,ro
    - ./initializers:/opt/netbox/initializers:z,ro
    - ./configuration:/etc/netbox/config:z,ro
    - ./reports:/etc/netbox/reports:z,ro
    - ./scripts:/etc/netbox/scripts:z,ro
    - netbox-media-files:/opt/netbox/netbox/media:z
    restart: always

  netbox-worker:
    <<: *netbox
    depends_on:
    - redis
    - postgres
    command:
    - /opt/netbox/venv/bin/python
    - /opt/netbox/netbox/manage.py
    - rqworker
    restart: always
  netbox-housekeeping:
    <<: *netbox
    depends_on:
    - redis
    - postgres
    command:
    - /opt/netbox/housekeeping.sh
    restart: always

  # postgres
  postgres:
    image: postgres:14-alpine
    env_file: env/postgres.env
    volumes:
    - netbox-postgres-data:/var/lib/postgresql/data
    restart: always
  # redis
  redis:
    image: redis:6-alpine
    command:
    - sh
    - -c # this is to evaluate the $REDIS_PASSWORD from the env
    - redis-server --appendonly yes --requirepass $$REDIS_PASSWORD ## $$ because of docker-compose
    env_file: env/redis.env
    volumes:
    - netbox-redis-data:/data
    restart: always
  redis-cache:
    image: redis:6-alpine
    command:
    - sh
    - -c # this is to evaluate the $REDIS_PASSWORD from the env
    - redis-server --requirepass $$REDIS_PASSWORD ## $$ because of docker-compose
    env_file: env/redis-cache.env
    restart: always
volumes:
  netbox-media-files:
    driver: local
  netbox-postgres-data:
    driver: local
  netbox-redis-data:
    driver: local
Bring the Docker container(s) back up and check they’re running:
Copy
sudo docker-compose up -d
sudo docker ps
Updating NetBox Docker
Below is a link to the official guide on how to upgrade to the latest release of NetBox via Docker.
Below is a link to the official guide on how to upgrade to the latest release of NetBox via Docker.
Thank you
Thanks for taking the time to read this. I hope these instructions help, and any issues with any of them or corrections, please let me know in the comments below.
